Document modification and customization (Print Format)
How to customize the layout of documents such as quotations, invoices, and delivery slips to suit your company's needs. Logo placement and layout changes can be done without coding.
✨ Key points of this page
- No need to contact a system company — You can change the layout of your forms in-house anytime.
- Duplicate standard forms and customize them instantly — Create your own forms based on standard templates such as quotations and invoices.
- Unified design for quotations, invoices, and delivery notes — Logo and company name reflected on all documents in a single letterhead.
overview
With ERPNext, you can freely customize the layout of all business documents, including quotations, invoices, delivery notes, and purchase orders. You can place your company logo, address, and company seal, as well as select which items to display and change the design yourself.
There are 3 stages of customization, so you can choose the one that suits your needs.
Screen URL:/app/print-format
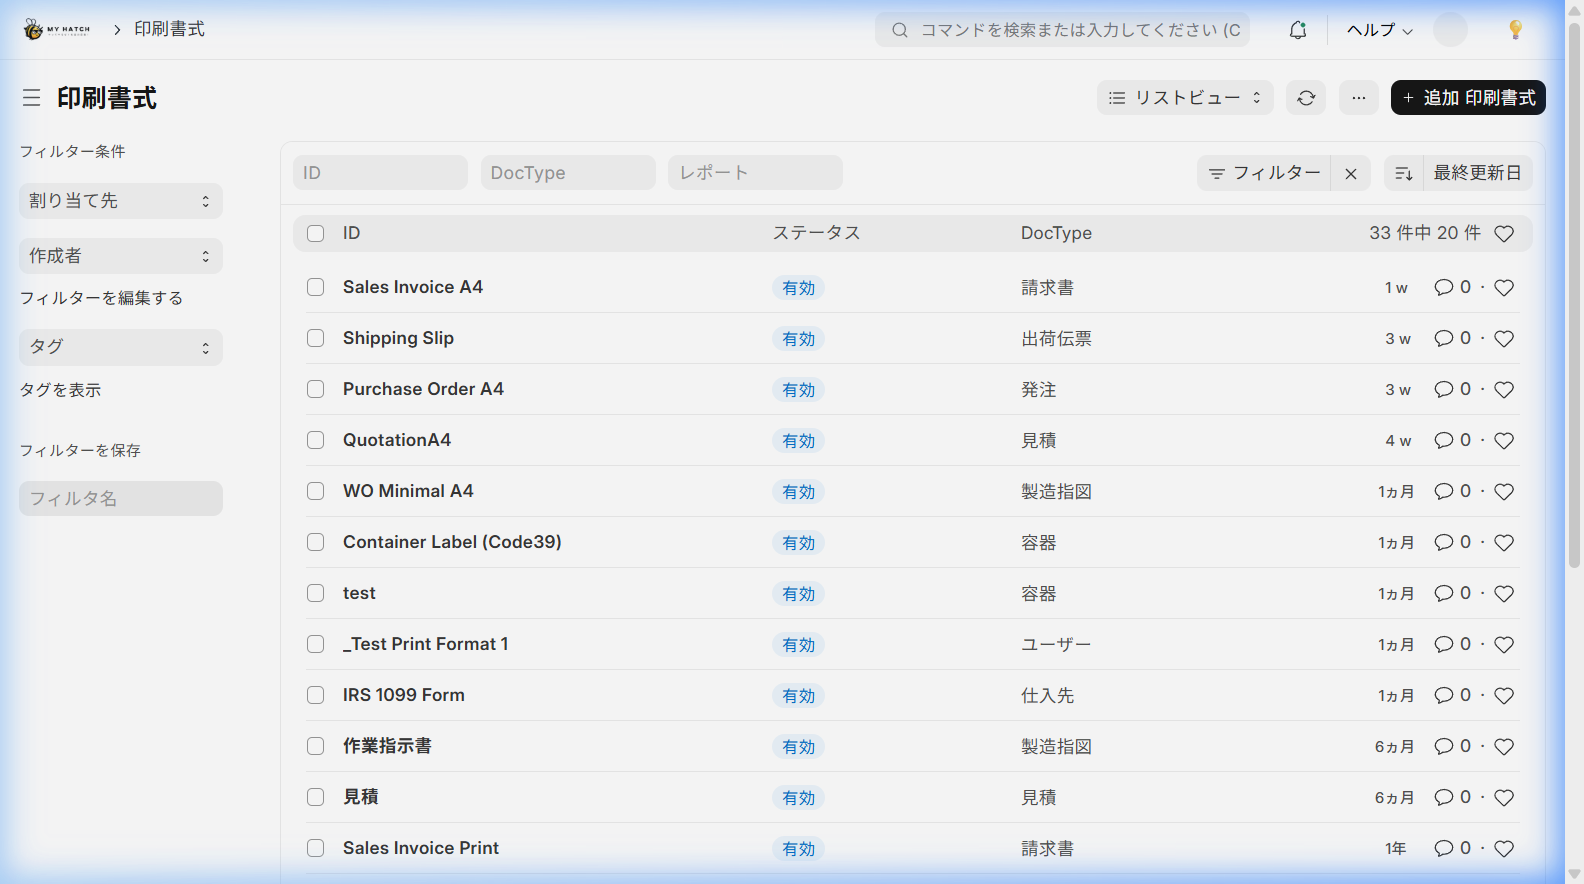
Issues Solved by Form Customization
| Until now (traditional method) | → | From now on (ERPNext) |
|---|---|---|
| Every time we change a form, we have to request it from the system company → Waiting several days to several weeks + cost | → | We can make changes in-house immediately. Zero cost |
| Inconsistent design across documents → Uneven brand image | → | Create all forms with a unified design. Increase company credibility. |
| Recreate the form in Excel and print it → Double work | → | One-click PDF output from ERP data |
| I want to change the position of the logo or company seal, but I can't do it myself. | → | Freely rearrange them using drag and drop. |
3 ways to customize
| Method | Difficulty | Recommended Situations |
|---|---|---|
| Method 1: Letterhead Settings | ⭐ Easy | I only want to change the placement of the logo, company name, and address |
| Method 2: Duplicate and edit the print format | ⭐⭐ Normal | I want to create a custom format based on a standard form |
| Method 3: HTML Template | ⭐⭐⭐ Advanced | I want to create a completely original form design |
Scene 1: Setting up the letterhead
You can set the header (top) and footer (bottom) that are displayed in common on all forms. Once you set your company logo, address, bank transfer information, etc., it will be automatically reflected on all forms.
Screen URL:/app/letter-head

Things to do
- Type "Letterhead" into the search bar.
- Click "+ Add" to create a new letterhead.
- Set the following:
| Item | Description | Example Input |
|---|---|---|
| Letterhead Name | Administrative Name | MyHatch 標準 |
| Letterhead based on ** | Header format (image or HTML) | 画像 |
| Letterhead Image | Logo Image to Display at the Top | Company Logo (PNG/JPG) |
| Footer Base | Footer Format (Image or HTML) | HTML |
| Footer HTML | Information to display at the bottom | Bank account details, important notes |
| Default Letterhead | Use this form as standard | Check |
- Click "Save"
Before / After
| Before | After |
|---|---|
| Manually apply the logo to each form | Set the letterhead once and it will be automatically applied to all forms |
| Modify all templates every time the recipient's bank details change | All documents will be updated at once by simply changing one footer section |
Scene 2: Duplicate a print format to create a custom format
You can create custom formats for your company based on standard print templates. Using Jinja (a template engine), you can freely customize display items and layouts.
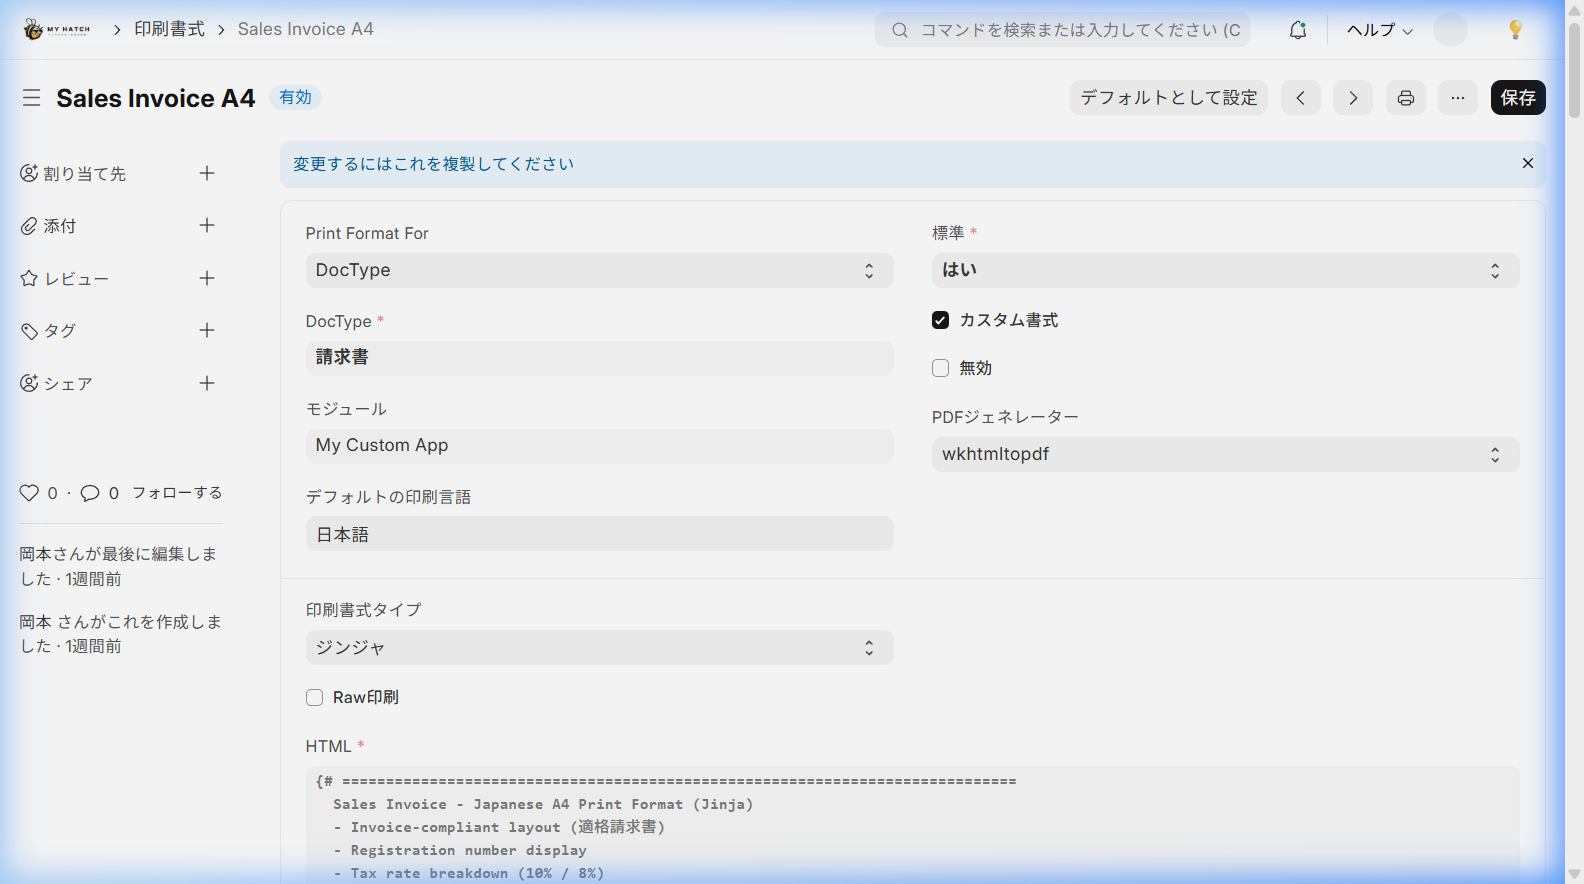
Things to do
- Type "Print Format" into the search bar.
- Open the document you want to edit (e.g.,
Sales Invoice A4) - At the top of the screen, you will see "Duplicate this to make changes", so select "Duplicate" from the menu.
- Edit the following in the newly duplicated print format:
| Item | Description |
|---|---|
| Print Format For / DocType | Type of document to be printed (e.g.,請求書 ) |
| Custom Formatting | Check this box to enable editing |
| Print Format Type | ジンジャ (Template engine) |
| Default Printing Language | 日本語 |
| HTML | Edit the form template |
- Edit the template in the HTML editor and click "Save".
Before / After
| Before | After |
|---|---|
| Changing print formats incurs outsourcing costs | Simply duplicate and edit the standard format. Zero cost |
| You cannot check the appearance after the changes without exporting to PDF. | Preview is available on the spot via the print button. |
Scene 3: Fully customize with HTML templates
If you want to create a completely original design, you can create forms from scratch using HTML and Jinja templates. You also have complete freedom with CSS styling.
Things to do
- Type "Print Format" into the search bar.
- Create a new one using "+ Add Print Format".
- Check the "Custom Format" box and set the "Print Format Type" to "Ginger".
- An HTML editor will appear, so write your template.
Basic Structure of an HTML Template
ヘッダー部分 ─── 会社ロゴ、宛先、日付、帳票番号
明細テーブル ─── 品目、数量、単価、金額の一覧
フッター部分 ─── 合計金額、備考、振込先
| Element | Description |
|---|---|
| Header | Company information, recipient, document number, issue date |
| Details Table | Item List (Automatically repeats depending on the number of rows) |
| Footer | Subtotal, Tax Amount, Total, Remarks, Stamp Area |
Before / After
| Before | After |
|---|---|
| Completely original forms are only available through outsourcing (hundreds of thousands of yen) | If you have HTML/CSS knowledge, you can create them in-house for free |
| Outsourcing costs for template modifications every time | Directly edit template files and reflect changes immediately |
List of Main Report Formats
ERPNext includes the following reports as standard. All are customizable.
| Form | Target DocType | Main Uses |
|---|---|---|
| Quotation | Quotation | Price presentation to clients |
| Order Confirmation | Sales Order | Confirmation and Agreement of Order Details |
| Delivery Note | Shipping Details | |
| Sales Invoice | Sales Invoice | Invoice to Customer |
| Purchase Order | Purchase Order to Supplier | |
| Inventory Details | Purchase Receipt | Confirmation of Inventory Contents |
| Purchase Invoice | Purchase Invoice | Verification of invoice from supplier |
| Manufacturing Order | Work Order | Instructions for the manufacturing floor |
Tips
- Setting Default Format: You can set a "default" format for each form. This format will be automatically selected when printing (open the form and click the "Set as Default" button).
- PDF Output: You can download the PDF from the "Print" button on the report screen. You can also attach the PDF to an email.
- Automatic attachment when sending emails: Email settings When combined with this, you can automatically attach PDF documents to emails and send them.
- Using multiple formats: You can create multiple formats for the same document and switch between them depending on the purpose (e.g., "External Quotation" and "Internal Quotation for Approval").
- Custom fields can also be displayed: Custom fields The items you added can also be displayed in the report.
📌 Summary of this article
- With ERPNext, you can freely customize documents such as quotations, invoices, and delivery slips to suit your own needs.
- With Print Designer, you can edit using drag and drop without any programming.
- By setting the letterhead just once, your logo, company name, and bank transfer details will be automatically reflected on all forms.