Purchase request (general)
This guide explains how to use the screen for creating purchase requests for equipment, outsourced supplies, and consumables by pasting URLs or manually entering information. Attaching drawings and specifications, submitting post-purchase reports, and reusing internal inventory can all be completed on a single screen.
Related Articles This screen is a purchase request hub for equipment, tools, outsourcing, and consumables. Purchase requests for raw materials used in manufacturing are handled here. Purchase Request Cart (Raw Materials) Please use this. After creating the ballot Approval Hub Approved by → Purchase Order Creation Editor Then the process moves on to creating a purchase order. The overall picture is Purchasing workflow Please refer to the following.
What you can do on this screen
The Purchase Request Hub (General) is a dedicated page for quickly creating purchase requests for items other than raw materials, such as supplies, outsourced goods, and consumables, by pasting URLs or manually entering information. It includes features such as automatically retrieving product information by simply pasting and analyzing the source URL, as well as post-purchase reporting (creating purchase requests for items already purchased), and cart and history management, all on a single screen.
Screen URL:/app/purchase-hub
Use it in these situations
- I would like to request the purchase of office supplies and tools.
- I would like to request outsourced processing.
- I would like to order services.
- I want to create a listing for a product I found on an online shop.
- I want to register a project that I have already purchased as a post-purchase report.
Differences from raw materials
Since a large number of items are automatically generated in conjunction with MRP for manufacturing raw materials, Purchase Request Cart (Raw Materials) This will process them all at once. This hub is optimized for tasks where you need to create tickets one by one based on individual judgment.
List of things you can do
| To do | Overview |
|---|---|
| Create a ticket using URL analysis | Paste the purchase source URL (Misumi, Amazon, MonotaRO, etc.) to automatically retrieve product information |
| Manual entry required | Manually enter product name, model number, quantity, and unit price |
| Search from Master Data | Search and add from existing item master data |
| 4 Types of Requests | Parts Purchase / Material Processing / Full Outsourcing / Service Outsourcing |
| Selection of potential suppliers | Clearly state your purchase intention: Model number specified / Equivalent product OK / Other |
| Post-purchase report | Register already purchased items retroactively |
| Cart Management | Submit multiple items together for bulk approval |
| History & Inventory Reuse | Duplicate and reuse past requests, check internal inventory |
Overall view of the screen
Top of the screen: 3 work modes
You can change your work mode by switching tabs in the upper right corner of the screen.
| Mode | Application |
|---|---|
| New Request | Create a request for the item you will be purchasing (default) |
| Inventory Utilization | Reusing internal inventory and surplus from other departments (avoiding purchases) |
| History | View/copy past purchase requests |
Summary Zone
A summary of your activity will be displayed at the top of the screen.
| Card | Meaning |
|---|---|
| Cart | Number and amount of pending deals |
| Awaiting Approval | Items that have been submitted and are awaiting approval |
| Orders placed this month | Total amount of orders placed this month |
| Return | Number of cases that were returned for return |
| Unread Comments | Number of unread comments from approvers, etc. |
Left sidebar
| Item | Contents |
|---|---|
| Purchasing Responsibility | Responsibility for departments, projects, products, etc. (editable) |
| Quick Actions | Shortcuts to frequently used actions |
| Post-purchase reporting | This is the entry point for registering already purchased items retroactively. |
Switching within the main area
While in "New Request" mode, you can further switch between modes within the main form (this is separate from the three tabs at the top of the screen).
| Switch | Content |
|---|---|
| Purchase Now | New Request Form (Standard) |
| Purchased (Post-purchase Report) | Post-purchase registration form for already purchased items |
Right side: Cart
The shopping cart is always displayed on the far right of the screen, allowing you to check your current order details.
Main Operations
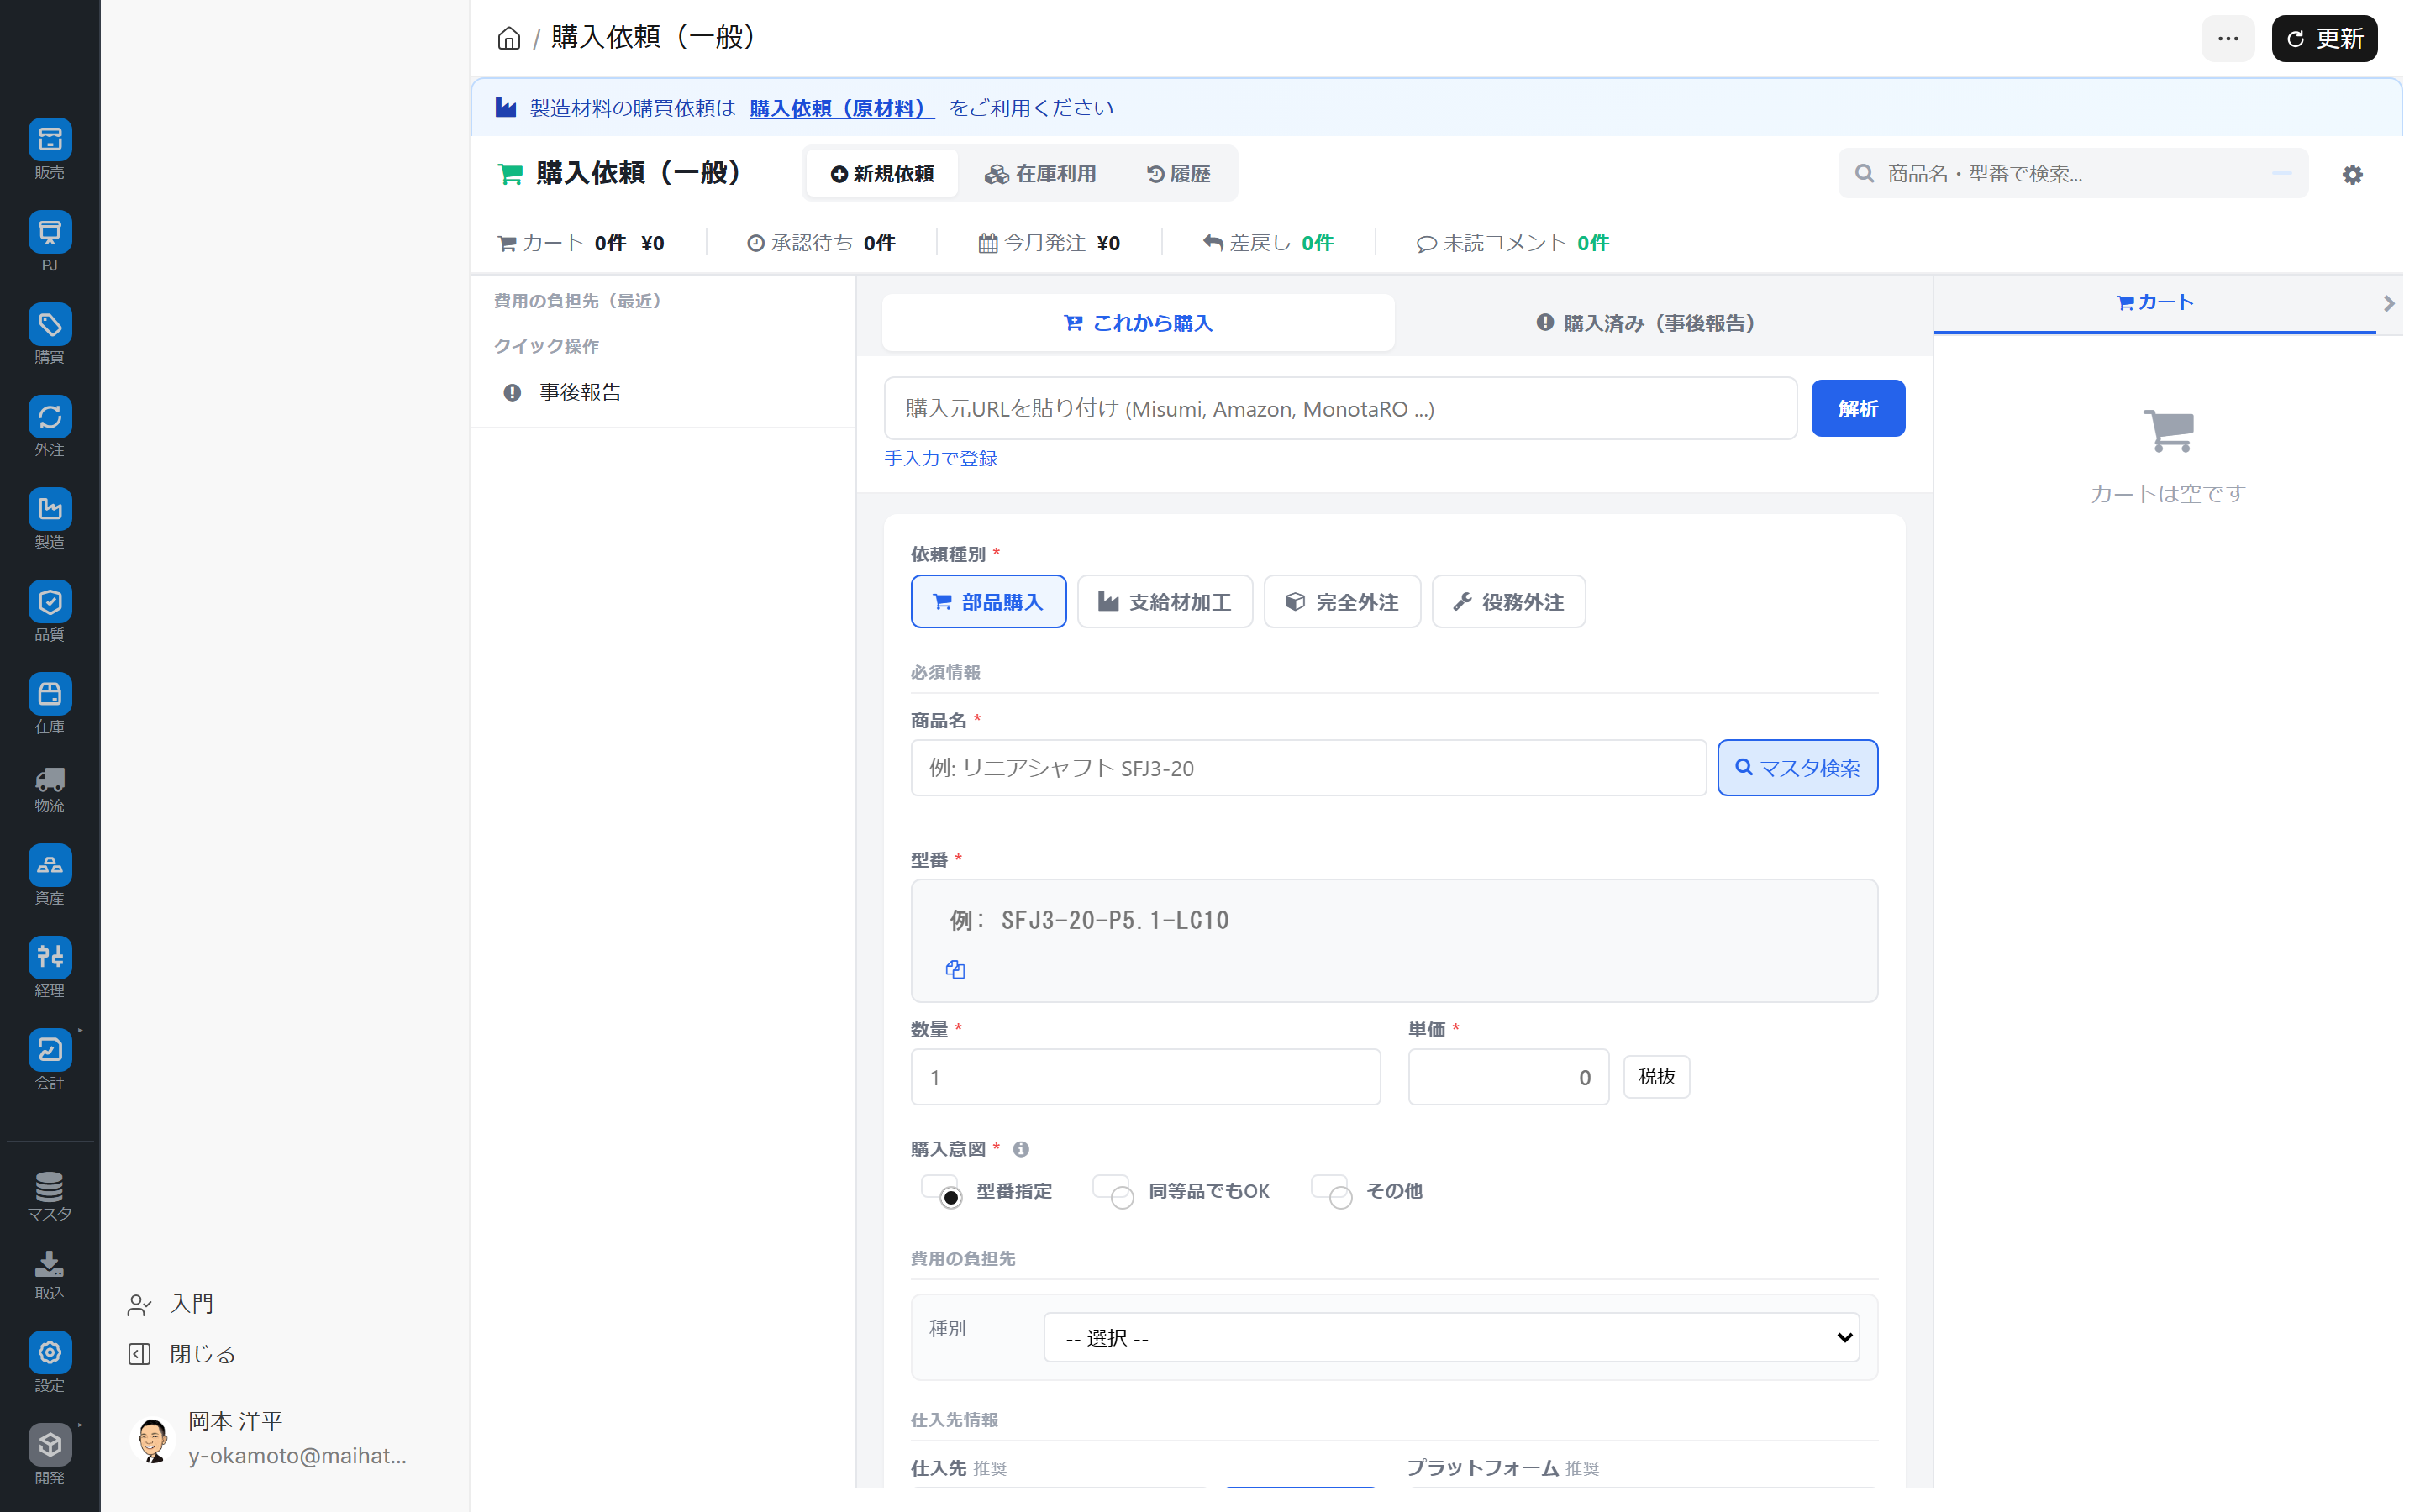
1. Create a ticket by pasting a URL (shortest route)
Paste the URLs of shopping sites such as Misumi, Amazon, and MonotaRO, and we will automatically analyze them.
Operating Instructions:
- Select Purchase Now
- Paste the URL of the purchase source into the input field at the top (e.g., the URL of the Misumi product page).
- Click "Analyze"
- Product information will be automatically retrieved (see "Items retrieved by URL analysis" below).
- Enter the quantity, who will bear the cost of purchase, and your desired delivery date.
- Add to Cart / Proceed to Approval Request
Supported sites can be expanded through settings. Even for unsupported sites, general-purpose OGP analysis will work, so even if the amount of information obtained is limited, some product information will still be filled in.
Items obtained through URL analysis
| Category | Item |
|---|---|
| Product Information | Product Name / Model Number / Image URL |
| Price | Unit Price |
| Ordering Conditions | Lead Time (Days) / Minimum Order Quantity / Unit of Sale |
| Classification | Specifications / Category / Purchase Source (Misumi / Amazon, etc.) |
Of the above, the items that can be obtained vary depending on the website.
3-tier analysis method
The analysis is divided into three stages.
- Dedicated Parser — High-precision parsers specifically designed for major sites such as Misumi and Amazon.
- General-purpose OGP analysis — Even on sites that do not support OGP, certain information can be obtained from OGP metadata (product name, image, category).
- AI Completion — AI completes items that the parser could not retrieve (limited number of uses).
Outsourcing-only URL Mode
URL?mode=subcontract When launched with parameters, it automatically switches to "Request Type = Fully Outsourced". This can be used as a way to directly pass URLs and drawing URLs from inquiry emails from outsourcing companies to the hub.
2. Create a ticket by manually entering the data.
This is used for websites where URL analysis is not possible, and for creating documents from catalogs and quotations.
Input Form (Some labels change dynamically depending on the request type; see below):
| Item | Contents | Required |
|---|---|---|
| Request Type | Parts Purchase / Material Processing / Full Outsourcing / Service Outsourcing | ✅ |
| Product Name / Deliverable Item Name | Example: Linear Shaft SFJ3-20 | ✅ |
| Model Number | Example: SFJ3-20-PS 1-LC10 (Display will change when fully outsourced) | - |
| Quantity / Quantity (person-days, number of times, etc.) | Unit notation changes when outsourcing services | ✅ |
| Unit Price | Only if known (If unknown, please check the estimate later) | - |
| Purchase Intent | Specify Model Number / Equivalent Item OK / Other | ✅ |
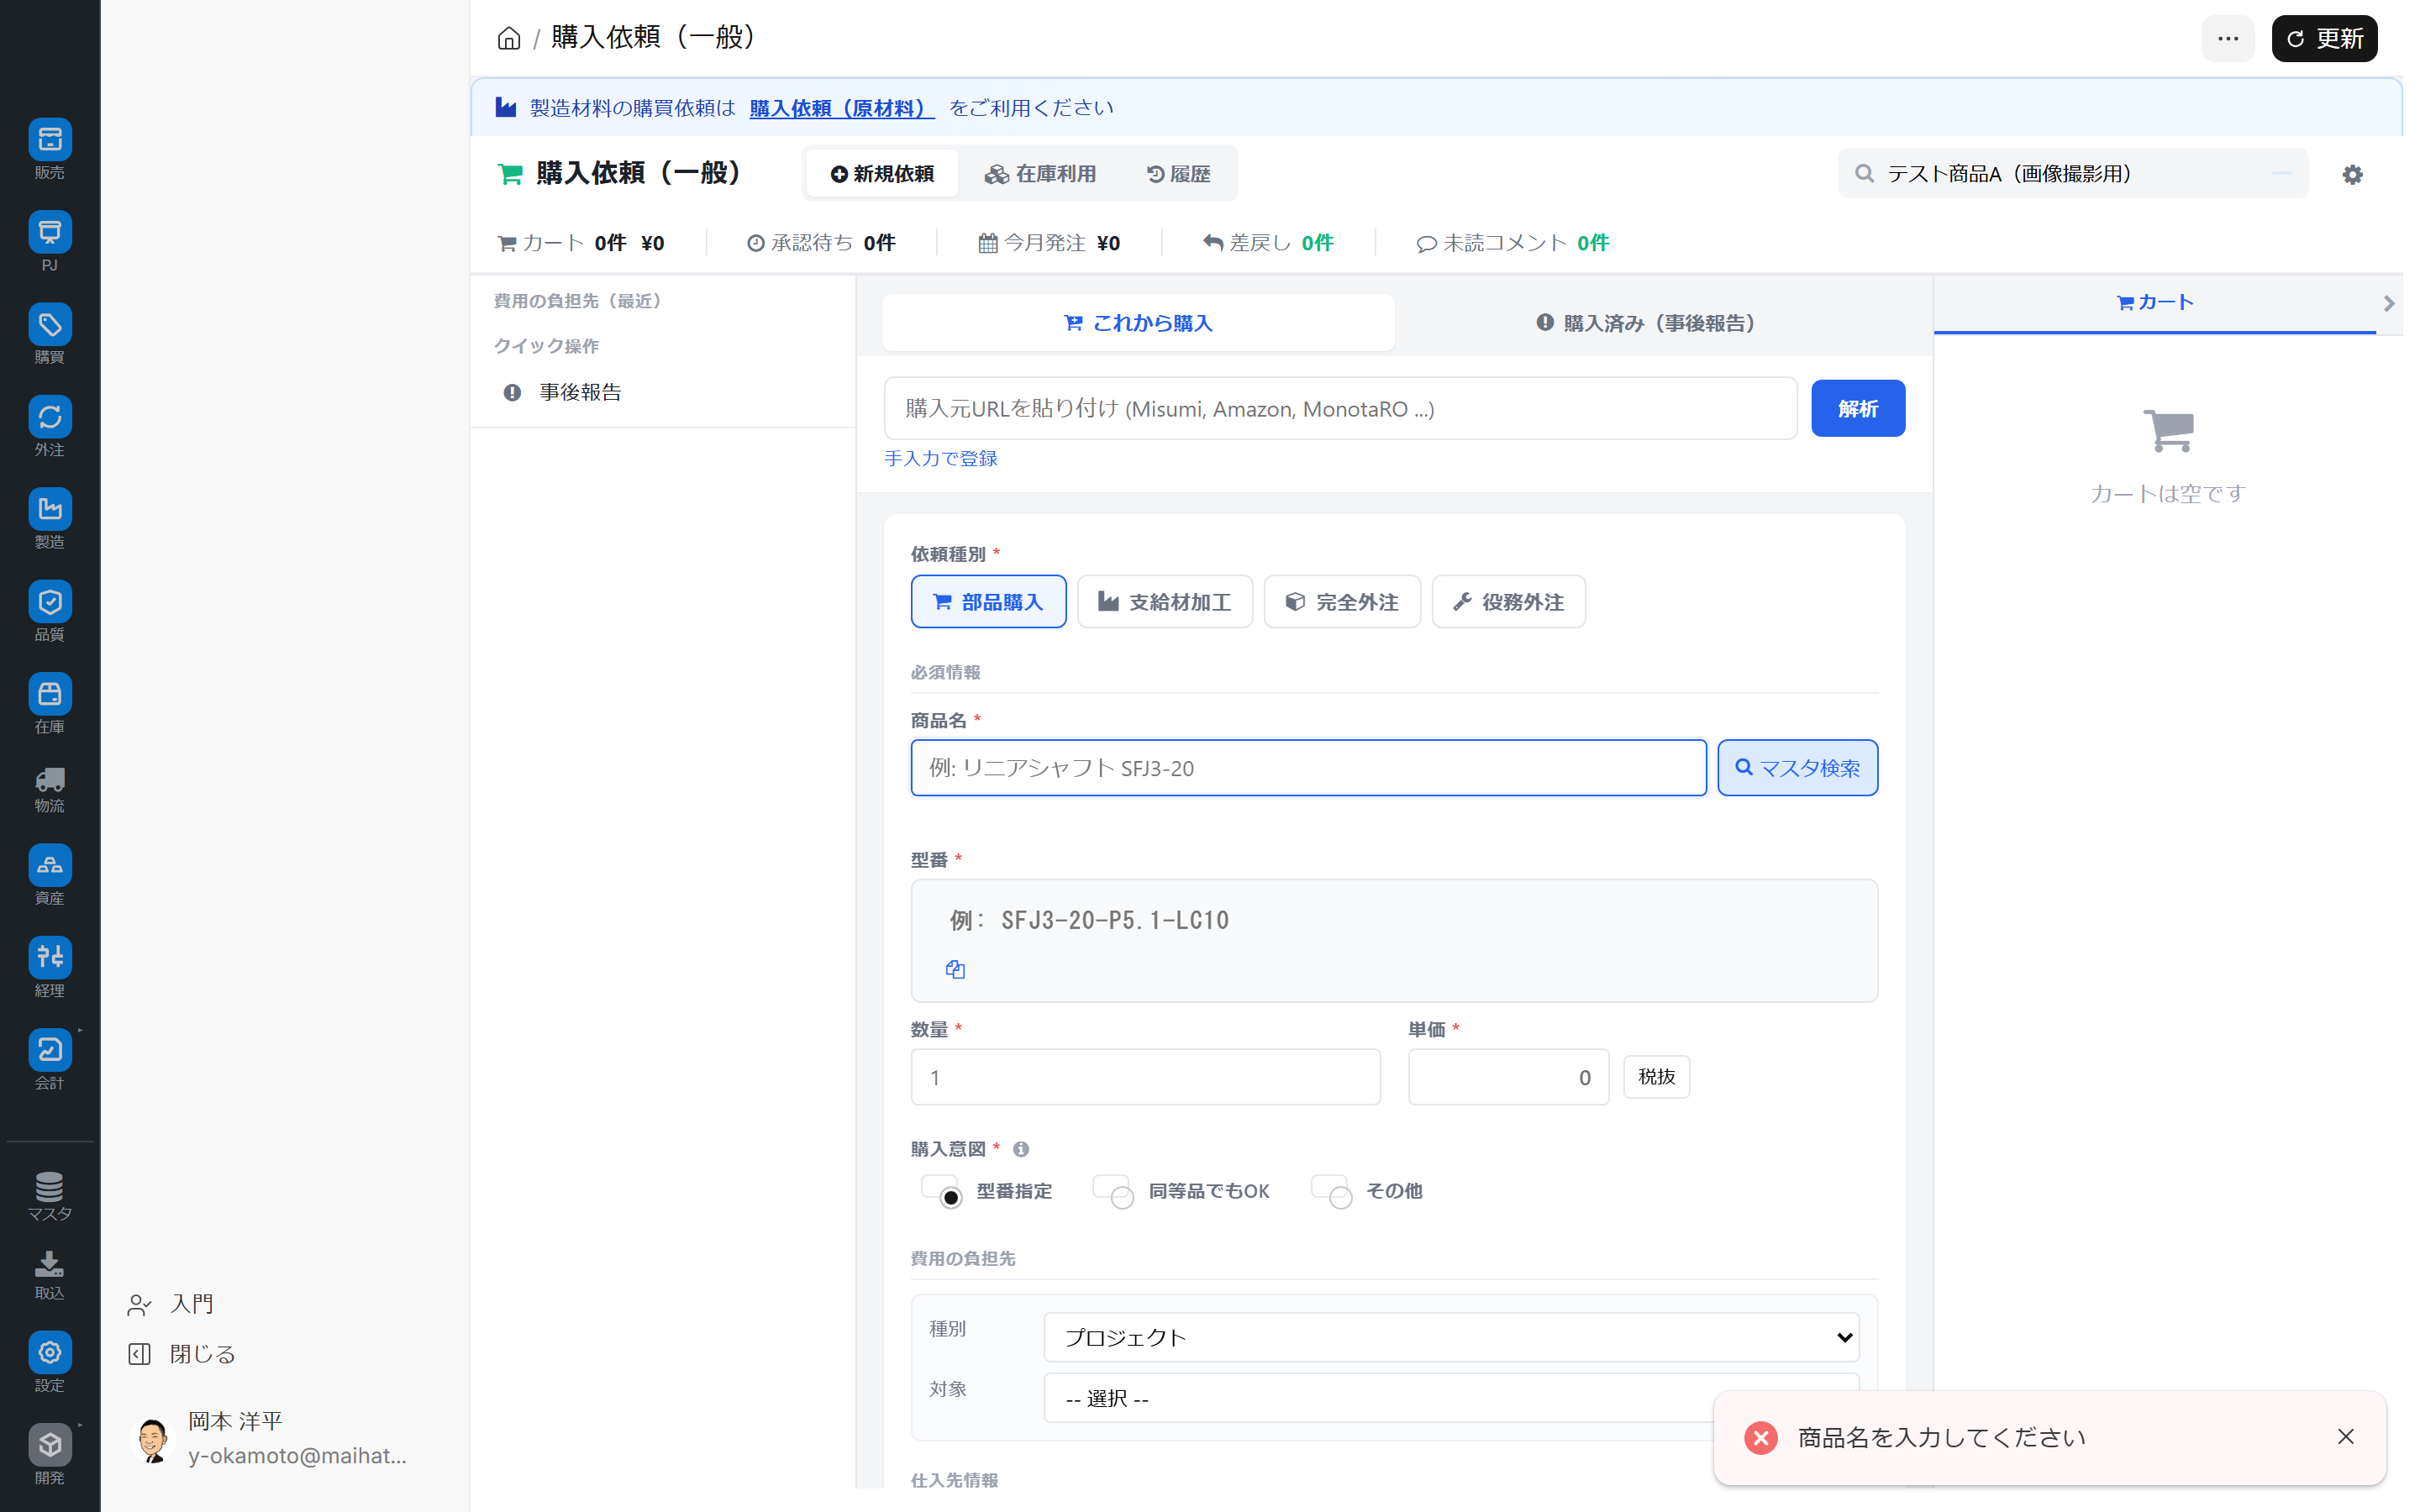
| Who will bear the cost of the purchase? | Select the purpose (department, project, etc.) from the dropdown menu | ✅ |
| Supplier Information | Supplier / Purchase Source Type (e.g., Amazon) | - |
3. Search from the master
For items you have purchased in the past, it is safest to select them from the master list.
- Click "Master Search" to the right of the product name input field.
- Search by item name, model number, or manufacturer.
- When you select the relevant item, the main fields will be automatically filled in.
4. Differentiating between types of requests
| Type | Typical Subject |
|---|---|
| Parts Purchase | Standard parts, office supplies, screws, bolts, etc. |
| Material Processing | We provide our own materials to a processing company for processing. |
| Fully Outsourced | Everything from materials to processing is handled by the contractor. |
| Outsourcing of Services | Services that do not involve receiving goods, such as cleaning, transportation, and repairs |
This classification also affects accounting treatment (asset or expense, account title).
Form display varies depending on the request type
When you switch the request type, the form labels will change dynamically.
| Request Type | Label Change |
|---|---|
| Parts Purchase / Processing of Supplied Materials | "Model Number" "Quantity" (Standard) |
| Fully outsourced | "Model number" → "Deliverable item name" changes |
| Outsourcing of Services | Change from "Quantity" to "Quantity (person-days, number of times, etc.)" |
This ensures that appropriate information is gathered for each type of request. By specifying the "name of the deliverable" instead of the impersonal "model number" when outsourcing, misunderstandings between the client and the contractor are prevented.
4-a. Attach drawings and specifications.
For fully outsourced, custom-made, or supplied material processing, attaching drawings and specifications may be mandatory.
Operating Instructions:
- Expand the "Drawings and Specifications" section of the request form.
- Select a file (PDF / Image / DWG / DXF, etc.) under + Add a drawing.
- Repeat if multiple files are needed.
- Each attachment can have a quote and a note attached.
Compare quotes from multiple vendors:
Since you can enter an estimated price for each attached file, you can attach PDF quotes from multiple vendors for the same drawing and compare the estimated prices. This allows you to record the basis for vendor selection within the request itself, improving the transparency of decision-making.
5. Add to cart and confirm all items
When creating multiple items at once, using the shopping cart is the most efficient method.
Operating Instructions:
- Enter the first item in the form and click "Add to Cart".
- The item will be added to the cart on the right.
- Continue by entering the second, third, and subsequent entries.
- Once you have all your items in your cart, click "Apply for Approval" at the bottom right.
- Each item is created as an individual purchase request and proceeds to the approval flow.
Required fields (check before adding to cart)
Request Type / Product Name / Model Number (for parts purchase, supplied material processing, or full outsourcing) / Quantity / Purchase Intent / Type (who bears the cost of the purchase) / Target — If any of these fields are empty, a warning message will appear in the bottom right corner, and the item will not be added to your cart.
6. After-action report
This is for registering items that you have already purchased due to an emergency or other reason.
- Select Purchased (Post-purchase notification)
- Paste or manually enter the URL of the purchase source.
- Attach the receipt (PDF / image)
- Enter the actual date for Purchase Date.
- Once the ticket is created, it will proceed to the approval flow with a "Purchased" status.
Post-event reports may be treated differently for audit purposes. Please check your company's regulations.
7. Inventory Utilization (Reuse of internal inventory)
If the item you intend to purchase is available as surplus inventory within the company, you can borrow or receive it using the Inventory Utilization mode.
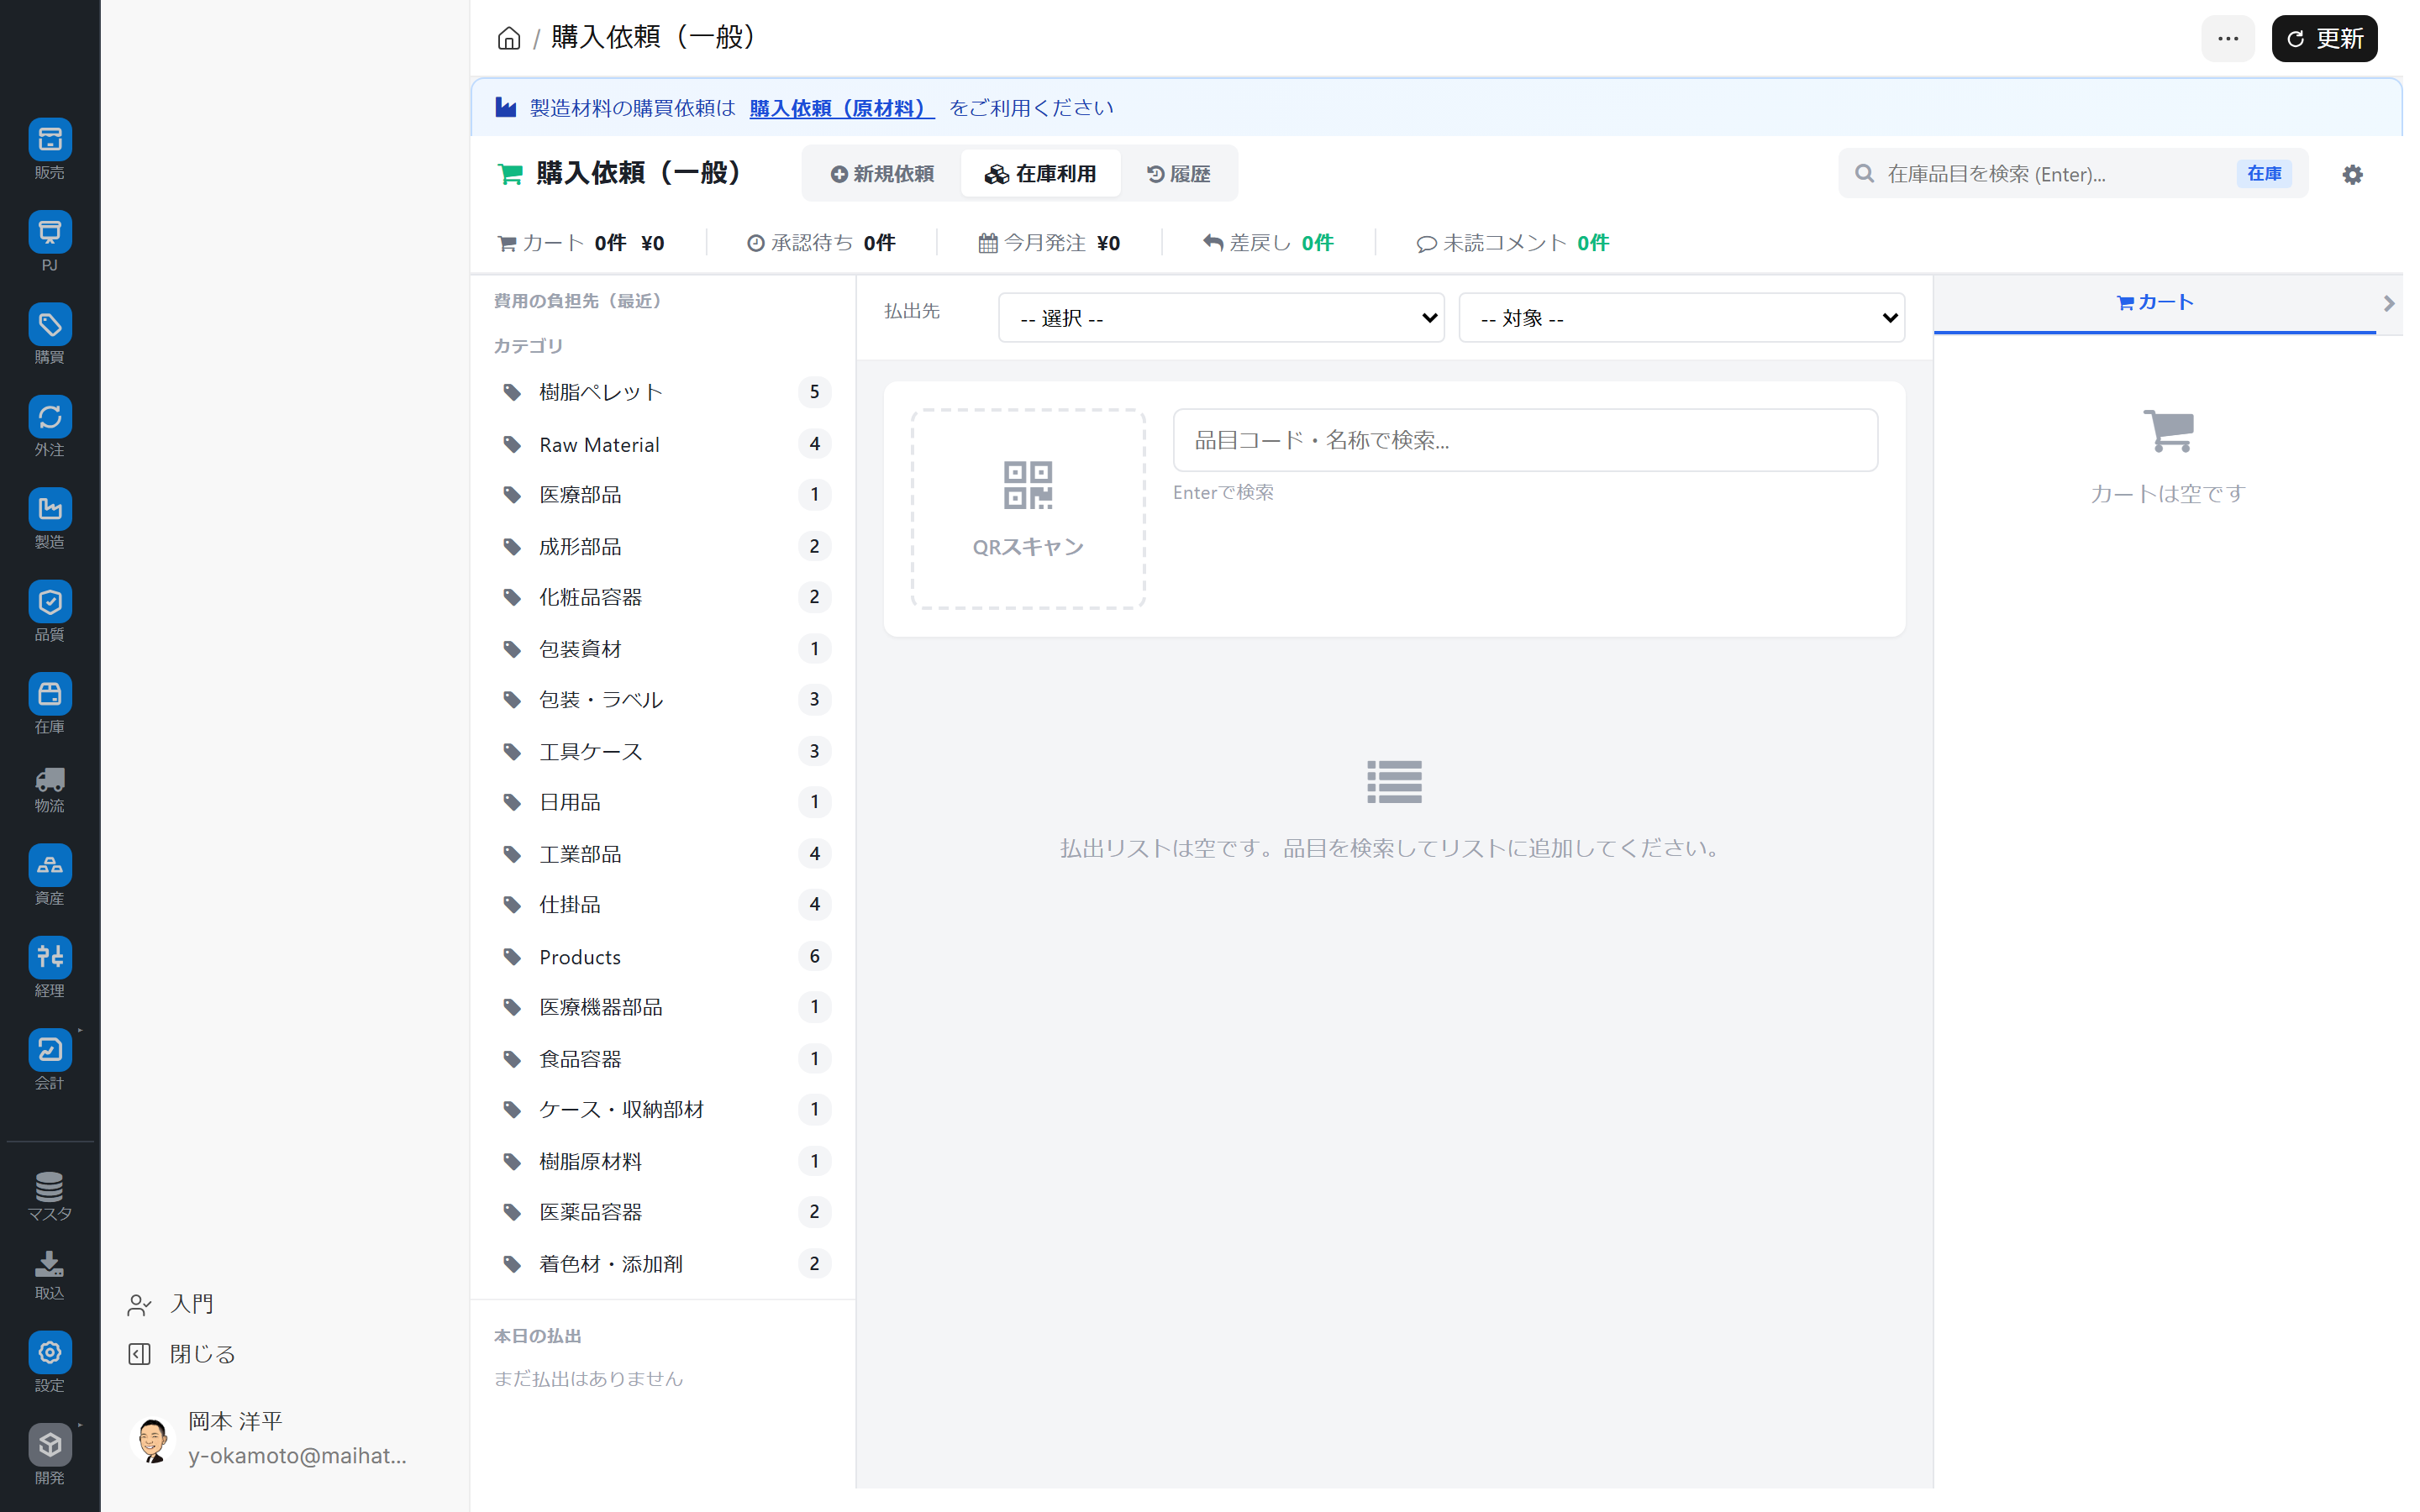
Operating Instructions:
- Switch to the Inventory Usage tab at the top of the screen.
- Refine your search using the Category List on the left, or search by Item Code/Name in the center (QR code scanning is also available).
- Select the Recipient / Target (project, department, etc.) at the top.
- Add the selected candidate to the disbursement list.
- Check the summary for the day in the Today's Payouts section.
This is an important feature from a cost reduction perspective. Making it a habit to check it once before placing an order can significantly reduce unnecessary purchases.
8. Copy from history
You can duplicate previously created requests and use them as new requests.
- Switch to History mode.
- Search past requests
- Select the relevant case and click "Duplicate and create a new request".
- Quickly create a ticket by only changing the quantity and date.
Bookmarklet function
This bookmarklet can be added to your browser's bookmark bar, allowing you to launch the request hub with a single click while viewing the purchase source website.
- Open "Bookmarklet Settings" from the Tools menu in the upper right corner of the screen.
- Drag the displayed JavaScript link to your bookmark bar to save it.
- Clicking while browsing the source website will automatically launch the purchase request hub and perform URL analysis.
Flow of Case Status
As a request progresses, the counters in the summary will reflect the progress of the ongoing request.
カート → 承認申請 → 承認待ち → 承認済み → 今月発注(発注書作成済)
                              ↓
                         差戻し(再起票要)
How to use the entire screen
The purchase request hub is a purchasing portal that combines a new request form with a summary, three tabs, a left-hand side, and a right-hand side. It is used in combination with the three tabs at the top of the screen: New Request / Inventory Withdrawal / History, and the "Purchase Now" and "Purchased" toggles within the new request mode.
1. Narrow down the target from the summary
The summary tile at the top of the screen not only displays the number of items, but you can also click it to move to the corresponding view.
| Tiles | Action on click |
|---|---|
| Cart | View unconfirmed cart on the right |
| Pending Approval | Go to the Pending Approval View in the History tab |
| Orders placed this month | Go to the Orders View in the History tab |
| Rejection | Displays rejected cases. Red highlighting may appear. |
| Unread comments | Open confirmation request dialog from approver |
| Delivery delays | Show only cases that are currently delayed |
2. Create a ticket in the New Request tab.
URL analysis retrieves information in the following order: dedicated parsers such as Misumi, Amazon, and MonotaRO, general-purpose OGP, and AI-assisted processing. The information retrieved includes not only product name, model number, unit price, and image URL, but also lead time, minimum order quantity, sales unit, specifications, category, and supplier type. If all information cannot be retrieved, a message indicating a usage limit may appear.
The request types include parts purchase / processing of supplied materials / full outsourcing / service outsourcing, and the form labels and required fields will change according to the selected type.?mode=subcontract If opened via a URL with an attachment, it will launch as a fully outsourced process. For fully outsourced or supplied material processing, managing attachments such as drawings, specifications, processing instructions, vendor quotes, and receipts (PDF) is especially important.
On the left side of the New Request tab, you can view who will bear the costs, post-reporting options, duplicate alerts, and potential repurchase candidates. The budget balance is automatically displayed when you select the request type and who will bear the costs, and a warning is issued if it's insufficient. Duplicate checks are performed when you enter part numbers or paste URLs, and links to existing requests are displayed. Selecting a supplier also allows you to view quality information such as on-time delivery rates and defect rates.
3. Use internal inventory in the Inventory Disbursement tab
The Inventory Withdrawal tab is for withdrawing internal inventory to avoid purchasing. Select the type and target of the withdrawal while reviewing the inventory categories and today's withdrawals on the left. Items can be found by QR code scan, item code, or item name search.
You will be warned if your safety stock falls below a certain level, and you can increase the quantity by entering it directly or by using the quick buttons for 1/5/10/50. You can add multiple items to the disbursement list and register them all at once. If you hit a budget constraint, you will be forced to register the item depending on your permissions.
4. Follow subsequent processes in the History tab
On the left side of the History tab, you can use saved views such as "All," "My Requests," "Pending Approval," "Ordered," "In Stock," "Rejected," and "Returning," as well as filters by range and supplier type.
In the details section, you can view the application details, approval information, attachments, delivery schedule, acceptance confirmation, return request, purchase corrections after approval, and request version history. For acceptance confirmation, you can select OK / Defective / Partially Defective, and attach photographic evidence if it is defective. For return requests, you can register the reason for return, quantity, return address, and photographic evidence, and then send it to the approval flow as a separate return request.
For approved and pending orders, you can later modify the quantity, supplier, unit price, etc., with a correction history. The reason for the correction must be provided, and a record of notification and confirmation will be kept for all relevant parties.
5. Don't let drafts and notifications interrupt your work.
Carts can be saved, restored, and deleted as named drafts. They are useful for creating monthly recurring order sets or templates for inspection equipment projects. Rejections and approval requests are reflected in real-time notifications, browser notifications, and summaries of unread comments.
Tips for Use
- Mastering URL Analysis: With Misumi, Amazon, and MonotaRO, most fields can be filled in simply by pasting the URL. This saves a lot of time.
- Prioritize Master Search: By selecting items with a history of use from the master data, errors in item codes and account titles can be prevented.
- Bulk processing in the cart: Every morning, add the items you need for the day to your cart, and then submit them all for approval in the afternoon. Approvers can also review them in one go.
- Make inventory utilization a habit: This is a major source of cost reduction. Make it a habit to check before placing an order.
- Post-event reporting should be a last resort: It's OK in urgent situations, but overuse will render the approval process meaningless.
- Bookmarklet: Useful for quick purchases when you're out on business or on the go.
- Write your purchase intention: Clearly stating "Specify model number / Equivalent product OK" will speed up the approver's decision-making process.
Common Problems
URL parsing fails
- Not a supported site → Register in manual input mode
- The product page layout may have changed → Notify administrator
The buyer cannot be chosen.
The master settings for departments and projects may be insufficient. Please ask your administrator to "add the burden recipient code".
Returned for remand
Click "Rejected" in the summary on the left, check the reason for rejection, edit the relevant case, and resubmit it.
Next Steps
- I want to see the approval status of the request I submitted. → Approval Hub
- Create a purchase order from approved requests → Purchase Order Creation Editor
- Request for purchase of raw materials → Purchase Request Cart (Raw Materials)
- Get an overview of the company's overall situation → Purchase Request Details (Company-wide List)