Create a purchase order
This guide explains how to use the screen that allows you to individually adjust the details for each supplier and create a purchase order based on approved purchase requests.
Related Articles If you want to create a purchase order for multiple items at once Ordering Workbench Use this first. This editor is accessed via F11 in the workbench, or launched directly, and is a screen for 1 carefully completing supplier purchase orders. When using the standard purchase order form in special cases Creating a purchase order (standard form) Please refer to the following.
What you can do on this screen
The purchase order editor is a dedicated page for creating purchase orders for a single supplier, adjusting each item individually. Unlike batch creation in the workbench, you can specify unit price, quantity, and delivery date in detail for each supplier, making it ideal for items that require careful ordering even in small quantities, or for non-standard orders.
Screen URL:/app/purchase-order-editor
How to use it with a workbench
| Screen | Suitable Cases |
|---|---|
| Ordering Workbench | Bulk ordering of raw materials that generates a large number of items at once through MRP integration |
| This Editor | For one-off, small-lot orders, carefully negotiating suppliers and unit prices Individual Orders |
| Standard purchase order form | Special cases where the requirements cannot be met with the two screens above |
List of things you can do
| To do | Overview |
|---|---|
| Supplier Selection | Specify one supplier to place an order with |
| Import Approved Requests | Add all outstanding purchase requests linked to the selected supplier to the line item in bulk. |
| Add from Item Master | Search from Item Master using F2 and add to line item |
| Paste from Excel | Paste detailed tables created in Excel all at once |
| Individual adjustments to unit price, tax rate, and delivery date | Overwrite values for each item |
| Refer to past purchase history | Refer to past purchase history and price range by selecting an item |
| Confirmation of Purchase Order | After saving as a draft, request approval → print → send via email |
Overall view of the screen
This screen has a single vertical column layout, with the following items arranged from top to bottom:
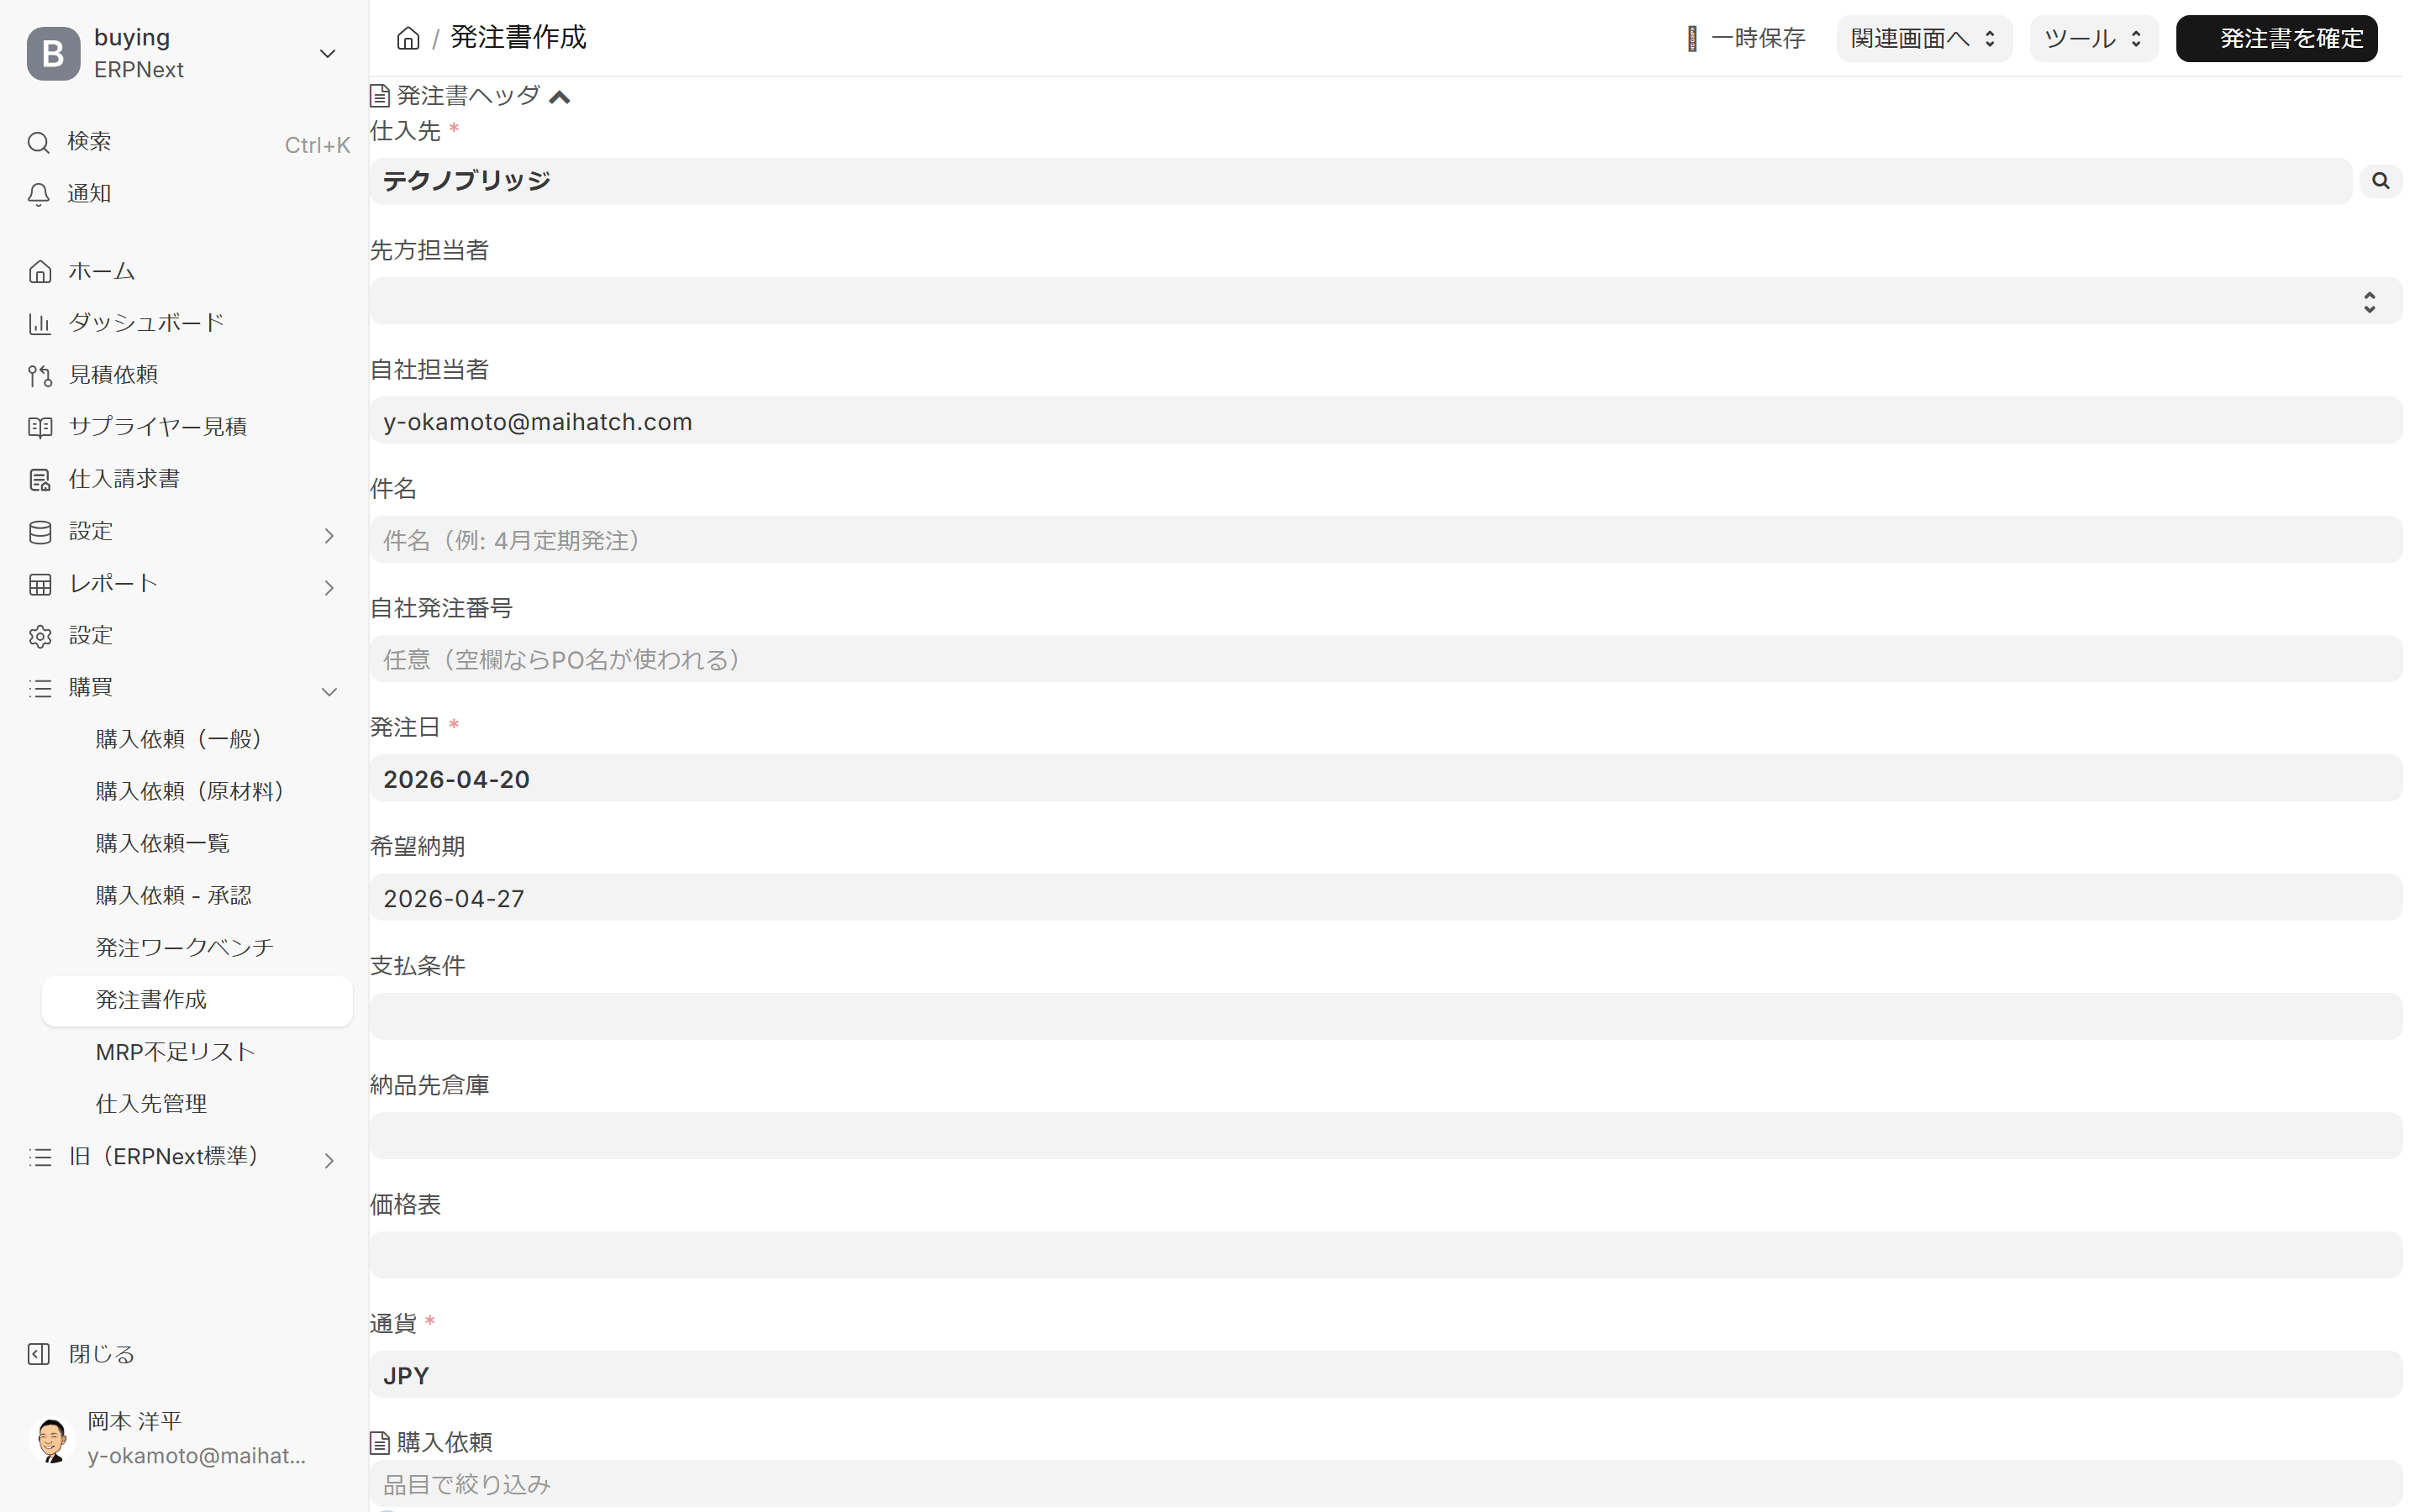
1. Purchase Order Header (Top)
Enter the metadata for the entire purchase order. This is a collapsible section.
| Item | Contents | Required |
|---|---|---|
| Supplier | Select a supplier. Once selected, any outstanding purchase requests associated with that supplier will be loaded. | ✅ |
| Contact Person at the Other Party | Supplier's contact person (This will be a possible recipient for the email) | - |
| Company Representative | Company representative (default is the logged-in user) | - |
| Subject | Subject of the purchase order (e.g., "April Regular Order") | - |
| Company Order Number | Any Order Number (If left blank, the order name will be used) | - |
| Order Date | Today is the default | ✅ |
| Desired Delivery Date | Standard is order date + 7 days | - |
| Payment Terms | Select from Payment Terms Template | - |
| Delivery destination warehouse | Receiving warehouse | - |
| Price List | Specifying a price list will be used for automatic allocation of unit prices. | - |
| Currency | JPY is the default | ✅ |
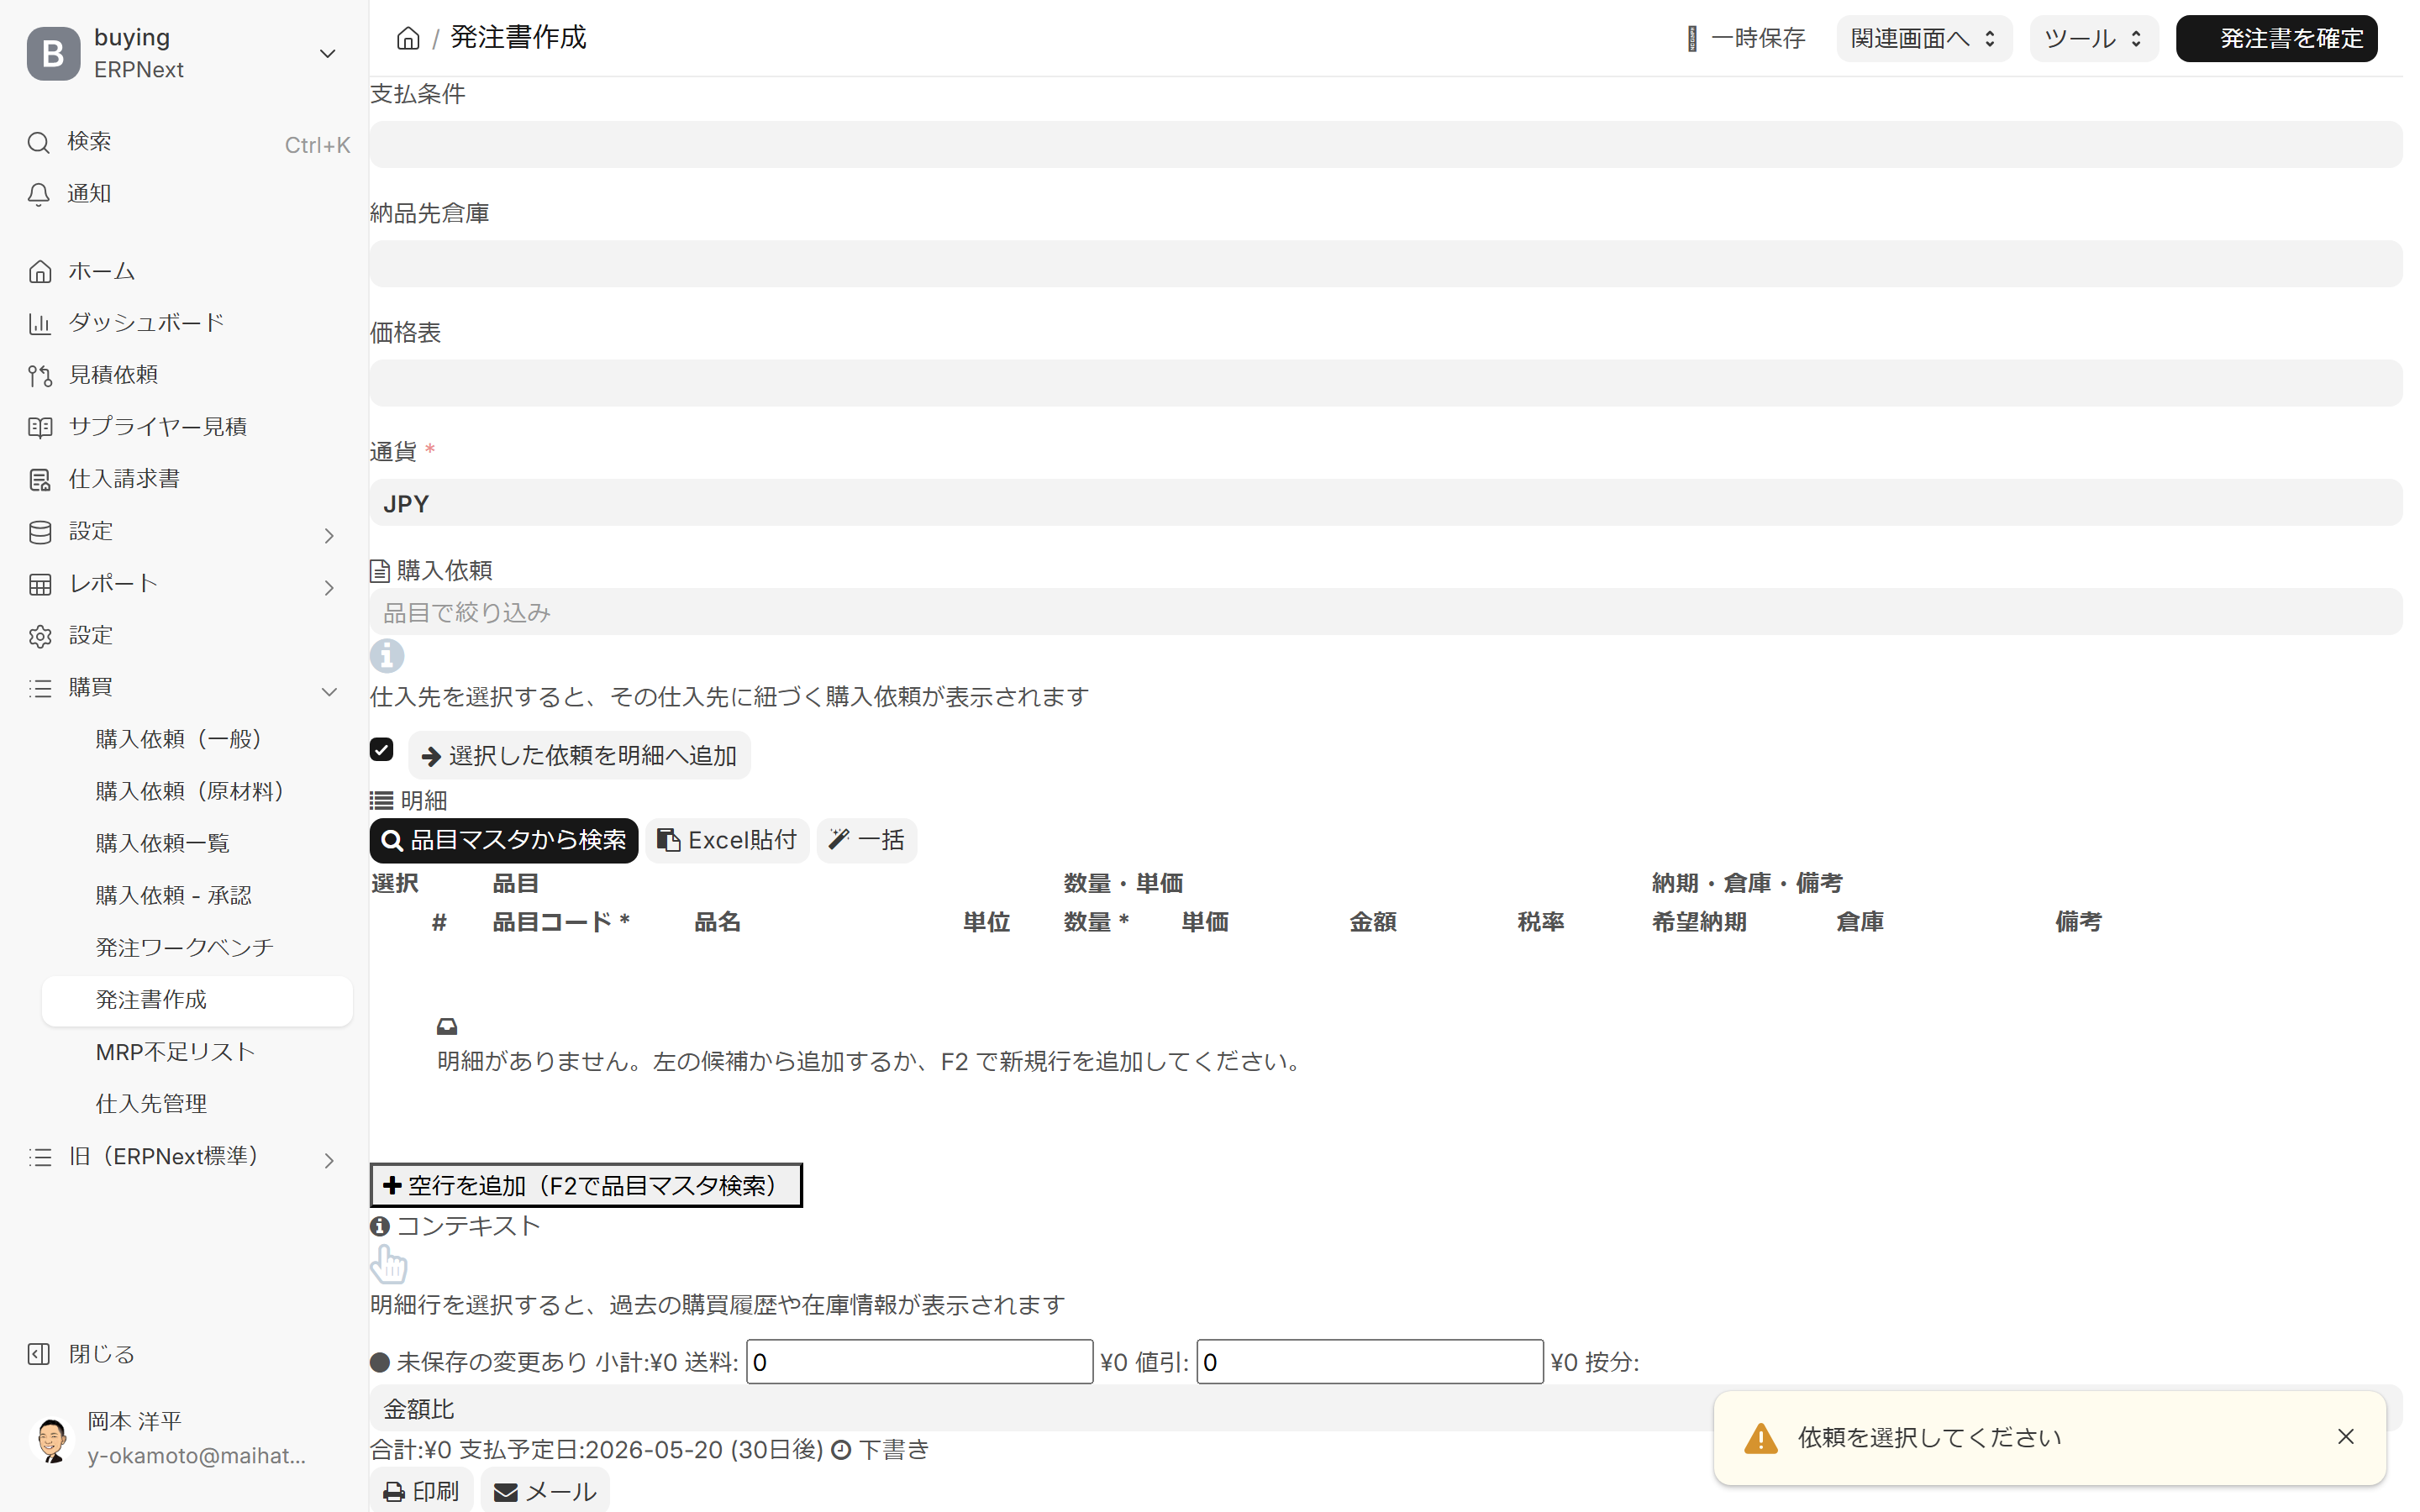
2. Details Section
Purchase Request Filter
By entering the item code in the "Purchase Request" input field, you can filter the supplier's outstanding requests to show only the relevant item.
5 ways to add details
- Add selected requests to the details: Select from the list of purchase request candidates and add them all at once.
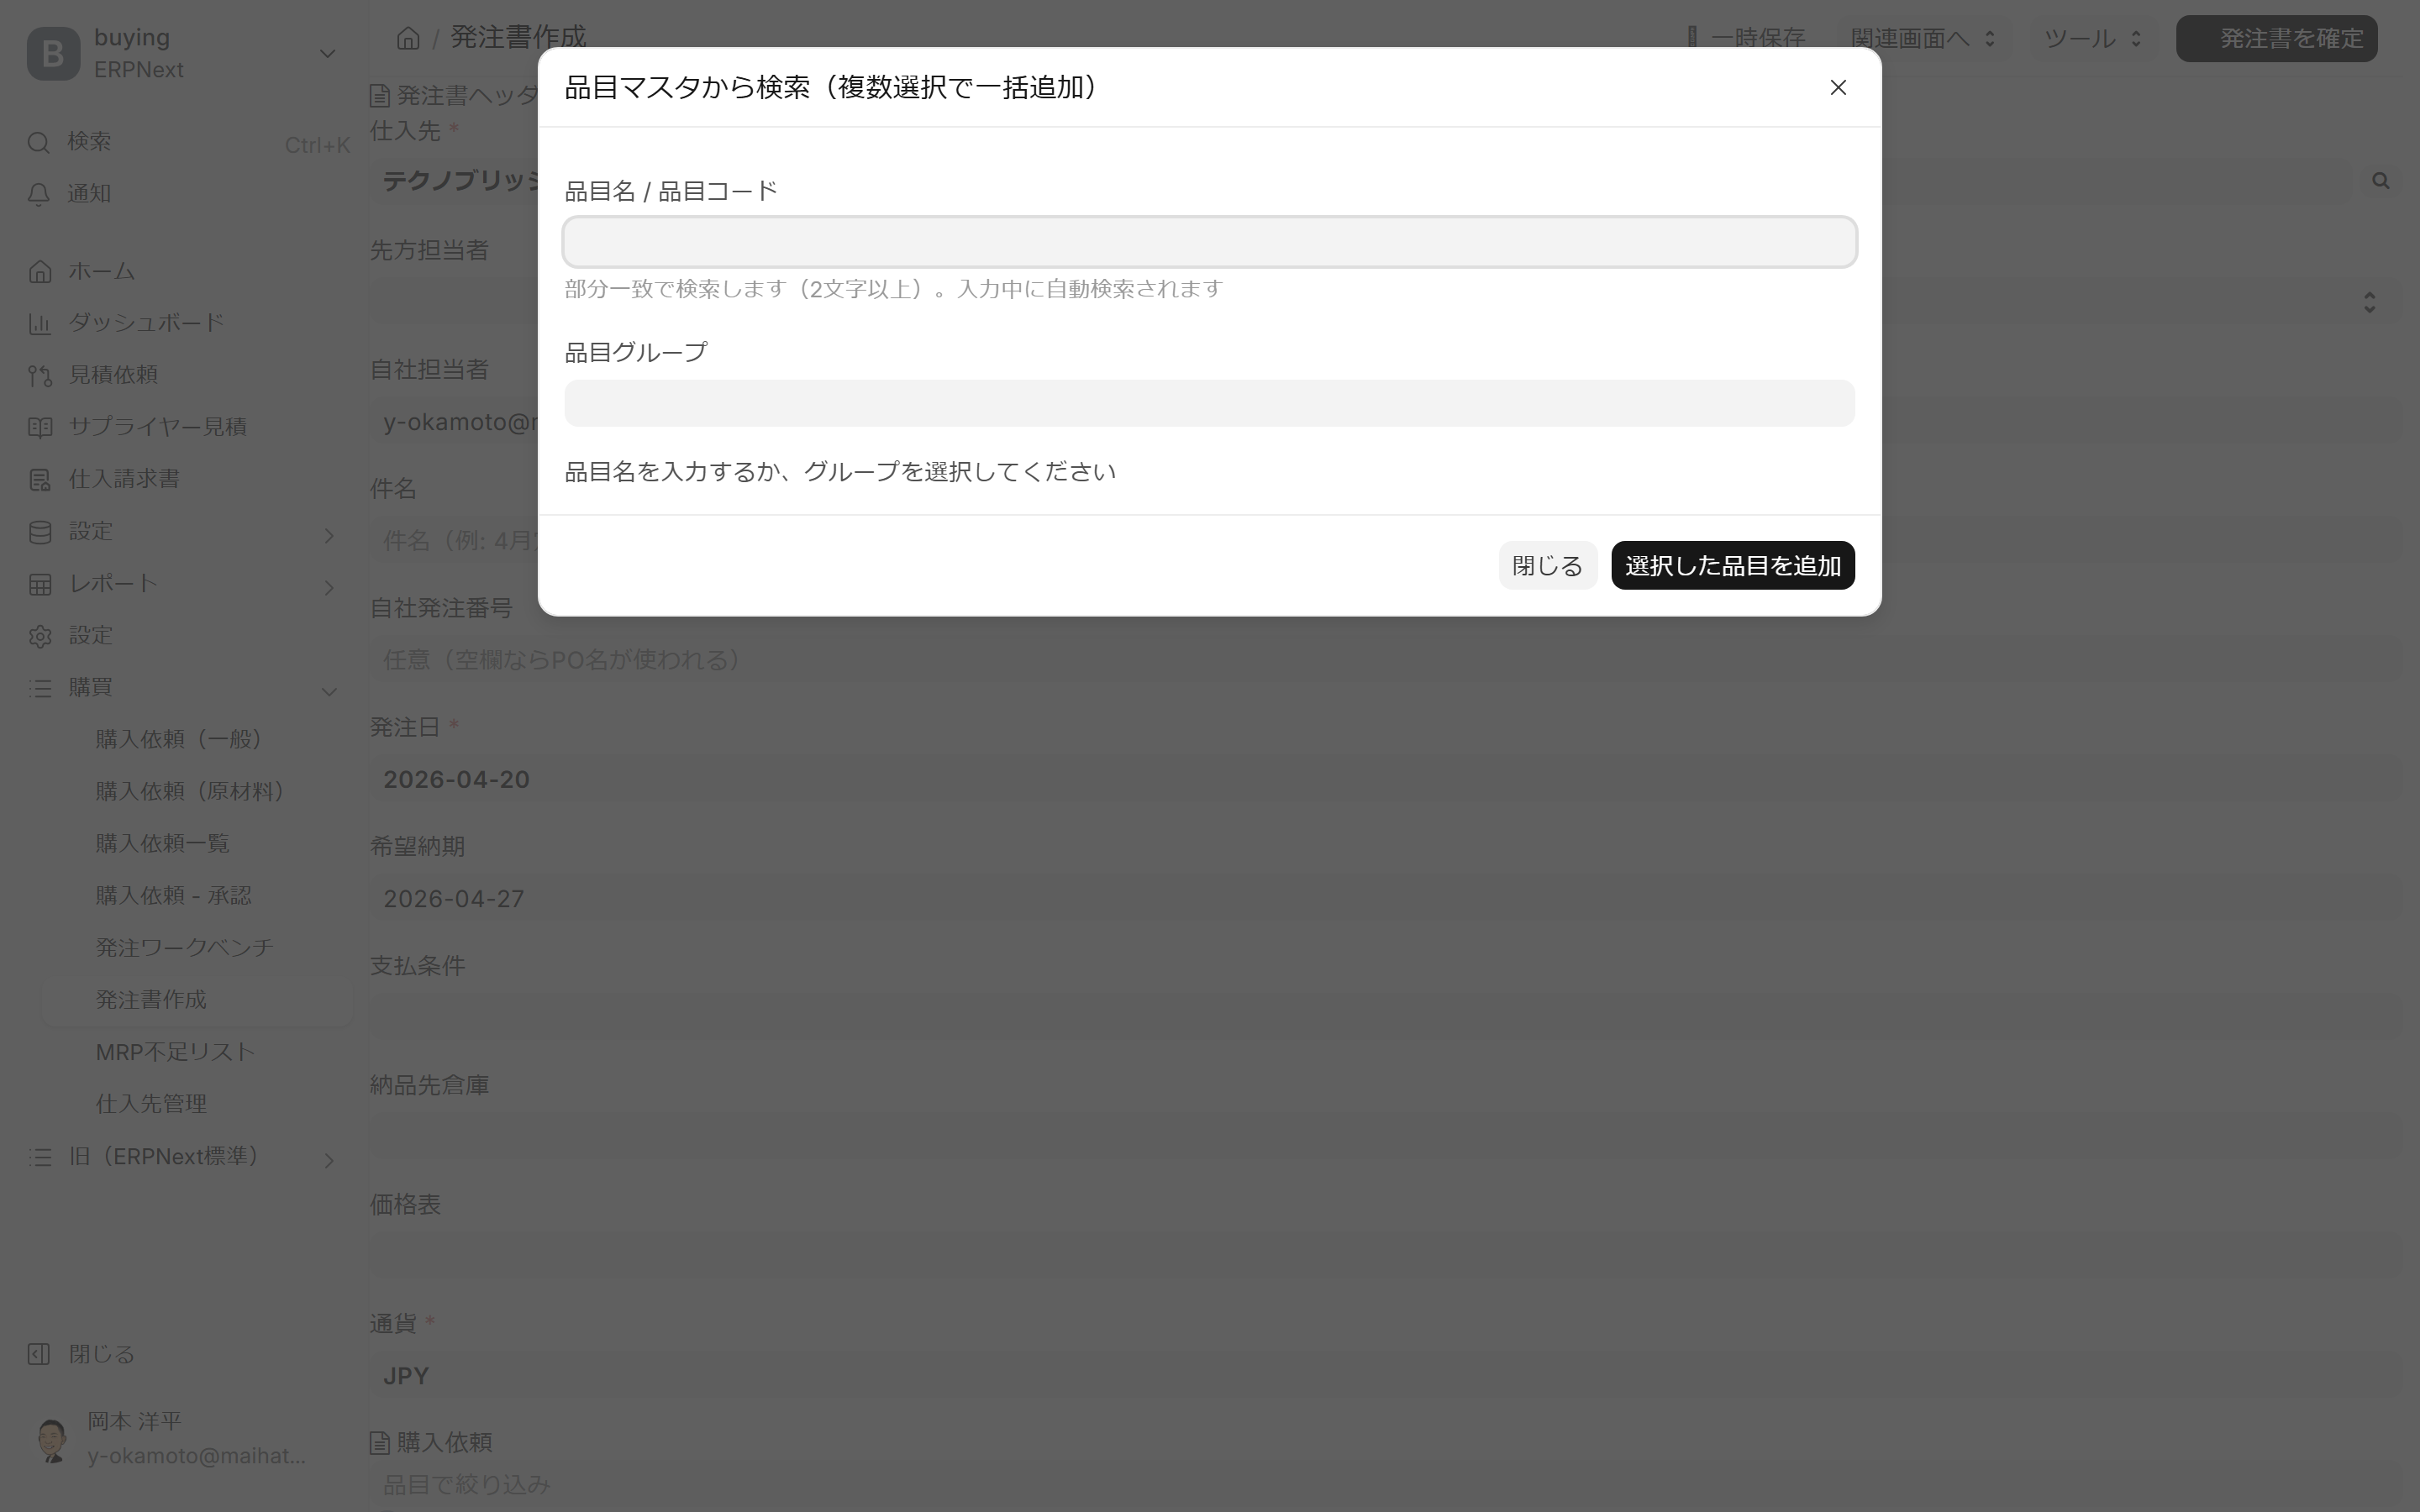
- Search from Item Master (F2): Add multiple items at once by selecting multiple items from the Item Master.
- Paste from Excel: Paste the details prepared in Excel (column order: Item Code / Quantity / Unit Price / Desired Delivery Date / Remarks)
- Bulk Input: Bulk input from regular templates, etc.
- Add a blank line (F2): Add one line at a time manually.
Columns in the detail table
| Column | Content |
|---|---|
| Selection | Checkbox (for batch operations) |
| # | Line number |
| Item Code | Item Master Code (Required) |
| Product Name | Auto-Complete |
| Units | Auto-completion |
| Quantity / Unit Price | Order Quantity and Unit Price (Directly Editable) |
| Amount | Automatic calculation of quantity × unit price |
| Tax Rate | Sales Tax Template (10% / 8% / 0%) |
| Delivery Date / Warehouse | Desired delivery date and warehouse location for each item |
| Remarks | Free text |
3. Reference Area (Bottom Right)
Selecting an item line will display past purchase history, market price range, and inventory information in the reference area. This is useful for verifying the reasonableness of unit prices and reviewing past transactions with the same supplier.
4. Total display (bottom)
This is a banner that is always displayed at the bottom of the screen.
- Unsaved changes available (Unconfirmed flag for ongoing editing)
- Subtotal / Shipping fee / Discount / Allocation / Amount ratio
- Total Amount and Due Date (automatically calculated from payment terms, e.g.:
2026-05-20(30 日後)) - Draft / Final status
- Print / Email button
5. The button in the upper right corner of the screen
| Button | Action |
|---|---|
| Temporary Save | Saved as draft (purchase order not yet finalized) |
| Go to related screens | Transition to Approval Hub, Workbench, etc. |
| Tools | Auxiliary Functions Menu |
| Confirm Purchase Order | The draft is finalized, and the purchase order is confirmed (it can now be printed or sent via email). |
Operating Procedure
Case A: When transitioning from the workbench (F11)
- The selected details will be automatically loaded into this editor.
- It is automatically split by supplier (depending on the splitting rules).
- Modify the unit price, delivery date, and remarks as needed.
- Save as a draft using "Save Temporarily"
- After reviewing the contents, "Confirm Purchase Order"
- If an approval flow is set up, the approver will be notified.
- After approval, send to the supplier via print/email.
Case B: When launching directly from the editor
- Click "Create Purchase Order" in the sidebar, or
/app/purchase-order-editorDirect access - When you select a supplier, any outstanding purchase requests will be loaded at the top of the screen.
- Add details:
- Select from pending requests → "Add selected requests to details"
- Select from the item master → F2 or "Search from Item Master"
- Details prepared in Excel → "Paste from Excel"
- Confirm quantity, unit price, tax rate, and delivery date.
- Save as a draft using "Save Temporarily"
- After reviewing the contents, "Confirm Purchase Order"
Keyboard Shortcuts
| Keys | Operation |
|---|---|
| F2 | Item Picker (Item Master Search Dialog, Add multiple items at once) |
| F3 | Bulk price setting (apply the same price to selected rows or all rows) |
| F4 | Delete row (undoable within 10 seconds) |
| F8 / Ctrl+S | Save (Draft) |
| F10 | Print Preview |
| F11 | Compose and send email |
| Ctrl+Enter | Confirm Purchase Order |
| Tab | Move to the next cell or input field |
| Enter | Confirm editing of the line item |
| Esc | Close the dialog |
Once you learn how to set unit prices in bulk with F3, undo with F4, and confirm with Ctrl+Enter, you can complete even purchase orders with many details without using the mouse.
Tax Rate Template
Standard tax rates within Japan are available as an option.
| Tax rate | Application |
|---|---|
| 10% | Standard tax rate |
| 8% | Reduced tax rate (food and beverages, etc.) |
| 0% | Tax-exempt |
You can change the tax rate individually for each item.
Automated input assistance
- Automatic Unit Price Allocation: When you specify a price list, the unit price will be automatically entered when you add an item.
- Reference to past performance: You can check the most recent purchase price range in the reference area.
- Scheduled Payment Date: This will be automatically calculated based on your payment terms (e.g., "30 days later").
- Default delivery warehouse: The warehouse in the header is inherited for each item (individual overrides are possible).
Extensions used for individual orders
The purchase order creation editor has a three-area layout on the actual screen: left side, center details, and right side. The top has a collapsible header, the top right has menus for temporary save, related screens, tools, and confirmation, and the bottom has unsaved badges, totals, due payment date, print, and email.
1. Manage purchase orders using the top right menu.
| Menu | What you can do |
|---|---|
| Save temporarily | Save unconfirmed purchase order as a draft |
| Return to Order Workbench | Return to Bulk Order Screen |
| Supplier Management | Go to Supplier Management |
| Shortcuts | Open keyboard shortcuts list |
| Clear New Order | Delete the entered content and restart as a new order |
| Revision | Revise the confirmed purchase order and create a new revision |
| Duplicate from past purchase orders | Select a past purchase order and copy all the details |
Revisions allow you to change quantities, specifications, delivery dates, unit prices, etc. The reason for revision is recorded in the audit log, so it can be used for updates after price negotiations or specification changes. When duplicating from past purchase orders, you can import the entire details of the supplier's most recent purchase order or a searched purchase order.
2. Add details
Pressing F2 opens the item master search dialog, allowing you to add multiple items at once. Selecting a supplier will display items you've frequently purchased from that supplier in the past. Entering an item code will automatically complete default values such as standard units, warehouse, and tax rates.
The details are arranged in 13 columns. It includes fields for selection, row number, item code, item name, unit, quantity, unit price, amount, tax rate, desired delivery date, warehouse, remarks, and delete. When empty, it displays a message saying, "Add from the options on the left, or add a new row with F2."
3. Edit the details together
| Operation | Contents |
|---|---|
| Ctrl+D | Duplicate selected row |
| F3 | Set unit price for selected rows or all rows at once |
| F4 | Delete row. Undo and restore within 10 seconds. |
| Paste into Excel | Import item code, quantity, unit price, desired delivery date, and remarks in bulk |
| Batch Editing | Simultaneously reflect unit price, desired delivery date, warehouse, tax rate, and remarks on multiple lines |
4. Determine the unit price and delivery date on the right side.
Selecting an item line displays past purchase history, inventory information, market price range, and communication history with the supplier on the right. Unit prices that deviate significantly from the median of the past 12 months are marked with a market price deviation badge. You can also review past quote requests, responses, and communications regarding delivery delays with suppliers, allowing you to immediately assess the reasonableness of unit prices and delivery dates.
5. Reduce errors with automated verification
Editing an order line triggers validation for duplicate orders, price discrepancies, delivery dates, tax rates, warehouses, and more. F12 updates the price discrepancy badge, and F13 triggers the delivery date validation internally. You will be warned if the desired delivery date is a past date, a public holiday, a weekend, or shorter than the lead time.
The payment due date is automatically calculated based on the payment terms, and adjustments are made for Japanese holidays and weekends, with the due date being the next business day. For foreign currency purchase orders, the exchange rate is also retrieved, allowing you to view the subtotal and total in JPY.
6. Organize tax rates, notes, and storage conditions.
If Japanese tax templates for 10%, 8%, and 0% are not registered, they will be automatically generated. The subject, remarks, and message to the supplier can be saved as company-wide or personal templates.
An unsaved badge will appear at the bottom if there are any unsaved changes. A warning will appear if you try to close the browser while making changes. It is also possible to set up automatic saving of drafts at regular intervals.
Tips for Use
- 1 Purchase Order = 1 Supplier: Purchase orders spanning multiple suppliers are created individually as separate editor sessions. It is more efficient to automatically split them using the "Split Rules" in the workbench.
- Save drafts frequently: While the "Unsaved changes" badge at the bottom of the screen is displayed, closing the browser may result in the loss of your edits. Save temporarily frequently.
- Utilizing Price Lists: Setting up price lists for each supplier drastically reduces the effort required to enter unit prices.
- Check unit price in reference area: When selecting an item, check the past purchase unit price on the right to avoid overlooking unit prices that deviate from the market rate.
- Formatting for Pasted Excel Data: If you arrange the columns of your existing purchase order Excel file in the order of "Item Code / Quantity / Unit Price / Desired Delivery Date / Remarks," the details will be automatically generated when you paste them directly.
- Using the subject line: If you use a subject line like "April regular order", later Purchase Request Details (Company-wide List) This makes it easier to search and link results.
Common Problems
"Please save your draft first" appears.
The Print and Email buttons are only available after saving as a draft or confirming the document. Please click Save first.
"Please select a supplier" appears.
Adding details and performing various operations requires selecting a supplier. Please enter the Supplier in the header first.
Unfulfilled purchase requests are not displayed on the left side
There may not yet be a purchase request linked to the supplier, or it may not have been approved yet. Approval Hub Please check.
Next Steps
- Once the purchase order is finalized, send it to the supplier via print / email.
- When it arrives → Material acceptance / Inventory Record
- Invoice processing → Purchase invoice
- Related overview → Ordering Workbench / Purchase Request Details (Company-wide)