EDI Import (Preliminary Orders, Kanban, Orders)
It automatically imports CSV/Excel files received from business partners and converts them into preliminary order, Kanban, and confirmed order data. It imports files received on paper or as email attachments directly, eliminating the need for manual data entry.
Related Articles To check all orders after import: Order Hub EDI mode (
?mode=edi) is used. Manual data entry via face-to-face or telephone is Individual Order Entry FAX is FAX Order . The overall sales process is Sales workflow See below.

What you can do on this screen
This function imports CSV/Excel files received from business partners and automatically converts them into order data (preliminary orders, Kanban cards, and confirmed orders) within the system. It imports files received on paper or as email attachments directly, eliminating the need for manual data entry.
EDI stands for "Electronic Data Interchange." It's a system for exchanging purchase orders and other documents between trading partners and computers.
Screen URL:
- EDI import:
/app/edi-import - Check the import log:
/app/edi-import-log-view

Types of data that can be imported
| Type | Registration destination | Purpose |
|---|---|---|
| Forecast | Daily Forecast | Pre-order quantity data indicating "approximately this much is planned to be ordered" |
| Kanban | Kanban received | Delivery instruction using the Kanban system |
| Order | Order | Confirmed Order Data |
Overall Flow
The import process proceeds as follows:
- Pre-configuration: Register column mappings, part number conversion tables, and validation rules for each customer.
- Upload File: Upload a CSV/Excel file and it will be automatically validated.
- Verification Results: Correct any errors or duplicates.
- Confirm: If there are no problems, click "Confirm" to officially register.
- Log Check: Check past import history.
Pre-configuration
1. Import Mapping
Since the file column structure differs for each business partner, you will need to register a setting in advance for each business partner to map which column corresponds to what data.
| Item | Contents |
|---|---|
| Mapping name | Identifying name (e.g., "○○ Supermarket Pre-Notification Format") |
| Business Partners | Target Business Partners |
| EDI Type | Informal Order/Kanban/Order |
| Column Mapping Table | CSV Column Number → Data Item Name Mapping |
Items that can be matched:
| Item name | Contents | Required |
|---|---|---|
| Customer Part Number | Part number used by the supplier | ✅ |
| Quantity | Quantity | ✅ |
| Delivery date/Notification date | Delivery date or notification date | ✅ |
| Unit Price | Unit Price | - |
| Order Number | Used when importing orders | - |
| Factory Code | Factory Code | - |
| Receiving warehouse | Receiving warehouse | - |
2. Customer Part Number Mapping
This is a correspondence table between our supplier's part numbers and our company's part numbers. The conversion is performed automatically during import.
| Item | Contents |
|---|---|
| Business Partners | Target Business Partners |
| Customer part number | Supplier part number |
| Company part number | Item code managed by our company |
3. Verification Rules
You can register validation rules for each item, such as quantity limits and date ranges. Data that does not meet the rules will be flagged during import.
Operating Procedure
Step 1: Upload the file
1./app/edi-import Open
2. Upload a CSV or Excel file using "Select File".
3. Select a trading partner (the appropriate import mapping may be selected automatically).
4. Select EDI type (preliminary notice/kanban/order)
5. Click "Upload"
At this point, the following will be automatically executed:
- Read the file and create an import log.
- Data transformation for each row according to the mapping
- Verification (checking product number, quantity, and date)
Step 2: Check the verification results
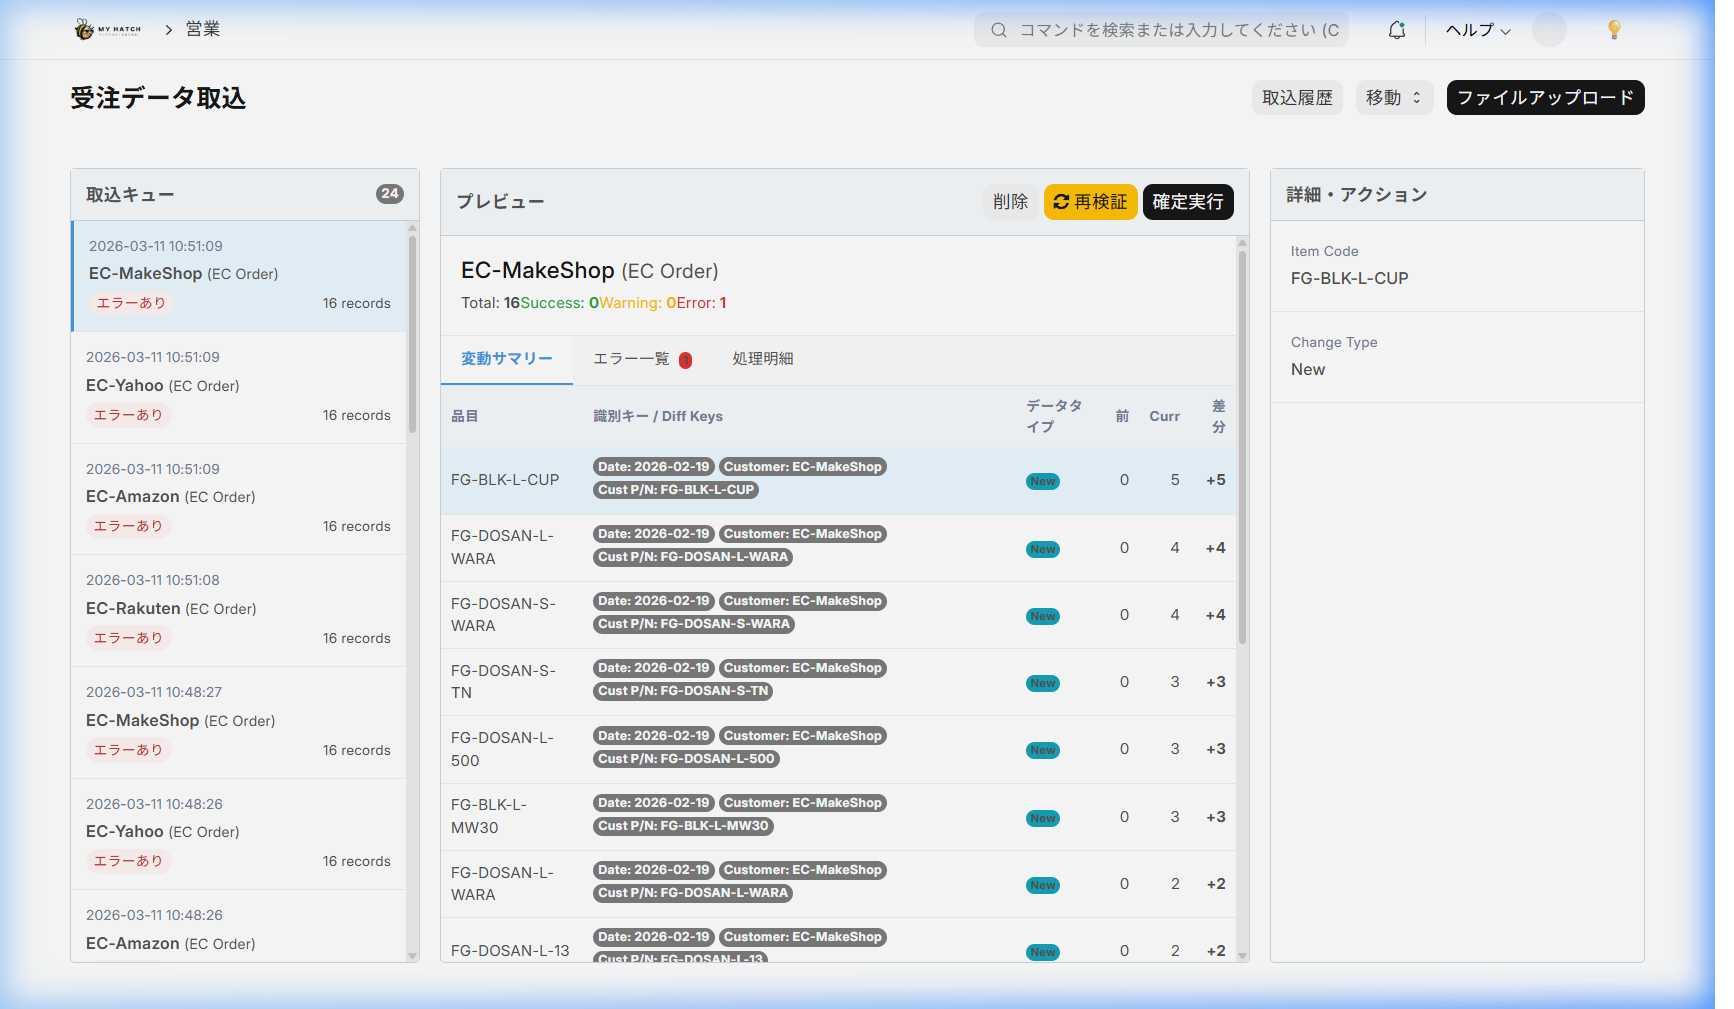
After uploading, each row will have a status assigned to it.
| State | Meaning | Next Action |
|---|---|---|
| Normal | No problem | Can be confirmed as is |
| Warning | Minor warning | Please review the content before confirming |
| Error | Problem detected | Needs correction |
| Duplicate | Duplicate with existing data detected | Deletion or consolidation required |
Items to be verified:
| Checklist | Contents |
|---|---|
| Part Number Mapping | Is the customer's part number registered in the part number mapping? |
| Quantity | Is the value valid, and does it not exceed the upper limit? |
| Date | Is it a valid date, or a past date/distant future warning? |
| Duplicate | Duplicate with existing data for the same item and date |
| Difference detection | Increase/decrease in quantity since the last import (in the case of preliminary forecast) |
Step 3: Error correction and duplicate handling
Correction of error lines
- If the cause is insufficient master data (part number not registered) Add the necessary master data → Press the "Re-verify" button to resolve the issue without re-uploading the files.
Handling Duplicate Rows
If duplicates are detected, you can take the following three actions:
| Operation | Contents |
|---|---|
| Delete | Change the selected row to be treated as deleted (re-examine remaining duplicate rows) |
| Sum | Add the quantity of the selected row to the other duplicate row. |
| Cancel | Revert deletion/combination |
Step 4: Confirm
- Verify that there are no error lines.
- Click the "Confirm" button.
- Select "Yes" in the confirmation dialog.
Processing upon confirmation:
| EDI Type | Documents Registered | Details |
|---|---|---|
| Informal Notice | Daily Informal Notice | Create one entry per item and date (update if an existing one exists) |
| Kanban | Kanban receipt | Create Kanban receipt data |
| Orders | Orders | Grouped by order number, created as 1 order = 1 order |
Additional information regarding order processing:
- Lines with the same order number are grouped together and registered as multiple line items in a single order.
- We automatically determine if an order will not overlap with existing orders using a unique key.
Step 5: Storing the files
Upon confirmation, the original EDI file is automatically stored in the vault.private/files/edi/ It will be saved in ). The file name is{取引先}_{日付}_{EDI 種別}_{元ファイル名} This format makes it easier to search later.
Difference detection (in the case of preliminary forecast)
When importing preliminary data, the difference from the previous import is automatically detected.
| Type of difference | Detection conditions | Display |
|---|---|---|
| Quantity Increase | Current Quantity > Previous Quantity | ⬆ Show Increase Amount |
| Quantity Decrease | Current Quantity < Previous Quantity | ⬇ Show Decrease Amount |
| Newly Added | Items Not Included in Previous Data | 🆕 |
| Order Changes | Changes to the preliminary order for already confirmed items | ⚠ |
The detected difference is shown on the forecast change history screen.demand_change_history_ui You can check it chronologically using the link provided.
Checking the import log

/app/edi-import-log-viewYou can then view and search past import logs.
| Display items | Contents |
|---|---|
| Log ID | Auto-assigned log ID |
| Business Partner | Source Business Partner |
| EDI Type | Informal Order/Kanban/Order |
| Status | Verified / Confirmed / Some Errors |
| Import date and time | File upload date and time |
| Breakdown of line count | Number of successful/warning/error entries |
Tips for Use
- Scheduled Import: For scheduled files from the same customer, the previously registered import mapping will be automatically applied, so from the second time onwards, you only need to select the customer.
- Utilizing Revalidation: After adding a master file, you can use "Revalidation" to resolve errors without having to re-upload the file.
- Handles large amounts of data: You can process thousands of rows of CSV files in one go.
- Audit-Ready: Confirmed files are automatically saved, so you can use them to review and submit the content later.